Showing posts with label Lack. Show all posts
Lack Library and Gallery Hack
Materials: Lack 43" and 74" Shelves
Description: I wanted an open library to house a lot of books and have room for art exhibition as well so I started researching LACK shelves. Reviews were mixed as to amount of weight they can handle so I determined I had to attach to minimum of two studs. US studs are 16" apart and on the 74" shelves, there are NO multiples of 16" from any other holes so I
1) confirmed stud location on the wall (and distance between)
2) measured and marked future holes on the rails which I then drilled.
3) Attached rails to studs.
For most cases I was able to hit 3 studs on both lengths of shelves. I'm really satisfied with the results though I might have to add the occasional L-Bracket for some of the shorter shelves that want to dip downwards somewhat. I'm still picking paintings and statuary for the open spaces in the design.
~ Amy S, Portland, OR USA
Alternative assembling/hanging of LACK zig-zag shelves
Materials: Lack zig-zag shelves, L-brackets, hardware
Description: This hack comes from Italy!
So, my partner and I bought 4 LACK zig-zag shelves, 2 red and 2 black ones, with the idea of stacking them all on the same wall, with alternating colours, but then changed our mind about it. Only 1 shelf went on said wall as originally planned, and we used the other 3 in alternative ways.
The red shelf, we turned into a holder for my partner's keyboard (pic above). We have this small guestroom he uses as his "study" and we wanted a floating shelf to hold his keyboard so it wouldn't take any space on the floor. That's where the remaining shelf came in handy! We assembled it in a different way (see picture), and to do so we drilled additional holes in the shelf so we could join the two Z-shaped parts together as we needed, using a couple more of those small wooden Ikea pegs.
Then we hung it to the wall and put 3 L-brackets under it for support. We needed the L-brackets because that wall is basically a plaster wall, unable to securely lodge the nogs, otherwise we would have used invisible nogs instead of the brackets.
So now we have the perfect keyboard-holder, with enough legroom under it to sit and play comfortably and shelves on each side to hold the loudspeaker and other stuff (and you can see a redecorated LACK square table on the side, too!).
Two shelves, the black ones, went to form a pretty decorative "shelf system" on another empty wall of our living room.
We hung the one on the left first, using the nogs that came with the shelf. Then we added some L-brackets under each horizontal section of the shelf to hold it in place and provide additional support. We didn't want the brackets to show so we made sure that the vertical "stem" of the bracket was hidden behind the vertical section of the shelf.
Once we had the first LACK in place, we proceeded to hang the second one. We divided it into 3 smaller L sections so it was easier to handle and we could drill the necessary holes into the wall more comfortably, assembling the next bit once the previous one was in place.
We started from the bottom, to form the larger bottom shelf, then proceeded upwards until the whole thing was securely in place.
We used some flat metallic brackets to join the two shelves at the bottom. Because our wall wasn't even, an irregular gap formed between the two shelves in the point where they connect to each other, so we carefully laid out a sheet of black adhesive "vinyl" paper over that part of the shelf, including the front edge, so it would cover the gap and create an even, seamless surface
We're really happy with the result!
~ Daniela, Rome, Italy
Labels:
Lack,
wall decor,
work station
LACK bar table on a EXPEDIT shelf
Materials: EXPEDIT, CAPITA, VIKA BYSKE, LACK
Description: It is a relatively simple hack.
A LACK coffee table is mounted on a EXPEDIT shelf. The photos should be self-explanatory. The table is attached with CAPITA to the shelf and is on the other side on two VIKA BYSKE legs.
1x EXPEDIT (101.030.88 59€)
1x LACK Coffee table (101.042.95 16,99€)
1x CAPITA (400.511.96 15,99€)
2x VIKA BYSKE (846.090.85 36€)
~ TimoP, Germany
Labels:
Expedit,
Lack,
work station
Lack small side table with shelf
Materials: Lack side table white (55*55*45)
Description: We needed a small table next to the couch. We bought a Lack side table and built a smaller shelf underneath.
We put the shelf together with L-shaped mounting bracket.
When we put the Lack in ordinary position it didn't show. A hidden shelf to put your remote controls!
~ Zanna, Sweden
Lack and Vika Amon Sideboard
Materials: 4 LACK side tables, 1 VIKA AMON table top
Description: The LACK side tables were assembled first and 2 of them were attached using L flat brackets to form one row. Next, they were attached to the VIKA AMON table top using eight 2.5" screws with washers.
They were placed upside down to use my weight to clamp them down firmly.
Once the VIKA AMON table top were attached, it was time to attach the lower row. I used flat metal brackets from GORM to fix them together. One is used on each leg at the back side. 2 pieces were also used to further strengthen the hold between the VIKA AMON top and the tables.
Since I plan to have plaster or gypsum boards covering the sides and back of the sideboard, I used L brackets to attach the top and bottom row, facing inwards. In the picture they look brass, maybe they are.
This is my first wood project since I was in high school so I'm proud of it even if it's very simple.
Enjoy!
See more of the Lack and Vika sideboard.
~ Ady Romantika, Malaysia
Dressing Table
Materials: 2 Lack shelves, 4 baskets, 1 circular mirror
Description: My boyfriend and I moved into our first apartment together - the only problem with the place is that the bathroom is very very tiny - and all of our stuff (mostly mine) just wasn't fitting.
I liked some of the dressing tables that they have at Ikea, but we don't have that much room in our apartment, and I didn't have room in my budget for something like that... So enter the shelves, and baskets! Problem solved.
~ Taryn, Toronto
IKEA Lack-console table
Materials: Lack table, shower curtain, contact glue
Description: Old and in poor condition Lack-console table. Covered with the table top and legs using a pixel pattern shower curtain.
Before: Surface worn and scratches...
Traditional painting instead I decided to glue an extra leftover shower curtain on the table :)
AFTER: My new shiny desk :)
~ Maija, Lahti, Finland
Lack Lazy Susan Coffee Table
Materials: Lack Side Table Legs and Lazy Susan Table Tops
Description: This creation was inspired by the 24 left over Lack Side Table legs I had after I created a headboard for my King size bed (See the post entitled "Headboard fit for a King-sized bed" for more details on that project).
This table took a couple of sequential steps before finally assembling each piece to form the final table.
First I designed three "+" shaped legs using five Lack Side Table legs, per leg and used double sided carpet tape to hold each "+" shape secure.
For each "+" table leg, I cut out a 7" diameter piece of MDF and attached each "+" leg to the MDF using 14 x 1" flat head screws after pre-drilling with a countersink bit. I used metal brackets on the opposite side of the "+" legs to secure the whole leg together.
I designed the table base as a double layered, offset "T" shape using eight table legs (four sections grouped into twos).
I slotted the "+" legs into the "T" base and used 14 x 3 1/2 " round head screws to attach each section (I also spray painted 1/4 washers with a flat black spray paint and bought black screw caps to mask the round head).
I then turned the whole structure on its head, and slid the Lazy Susan tops underneath, attaching them to the 7" diameter MDF.
This project used a total of 23 Lack Side Table legs and three Lazy Susans. The reason I used 14 (width size) screws is because the pre-drilled holes in the Lack legs were sized at a 14 width.
It took a lot of preplanning and forethought to assemble this coffee table, but being my first ever built piece of furniture, I'm very proud of it.
Hope you enjoy.
~ Doug Lu, Ontario Canada
Labels:
furniture,
Lack,
living room,
Snudda
A headboard fit for a King-sized bed
Materials: Lack Side Table
Description: I built a headboard out of eight (black/brown coloured) Lack Side Tables. I attached them four wide by two high and turned all the table tops so the wood grain lined vertically. I then attached some of the table legs onto the structure to support the whole structure.
If I were to do it again, I'd probably wall mount it, but it is fine wedged between the wall and bed. Attached you'll find pictures of the actual headboard as well as figures 1,2,3 which show an illustration of the wood grain orientation, the back view, and the back view with the brackets, respectively.
I then recycled the unused table legs and a few Ikea Lazy Susans to create a coffee table. Please see the post entitled "Lack Lazy Susan Coffee Table" for more details.
~ Doug Lu, Ontario, Canada
Ikea Lack table into Lack floating shelves!
Materials: Lack table, brackets (Dormer type probably or any other), L brackets, screws, saw, drill
Description: We wanted two side-tables for the bedroom, but we thought that it would be more convenient to be the floating type like the IKEA Lack floating shelf. So the next day I visited IKEA store, and tried to find one that would be matching the space in size. Unfortunately I realized that the Lack shelves are only made 110cm and 30 cm long and there is nothing in between, which would fit for my needs. So I had a brilliant idea! Why not make my shelves by cutting into half an IKEA Lack table which only costs 5 euros!
So on my way to the cashier with a black Lack table, I stepped in to the "as is" department and the exact time there was a batch of ex-display tables for half the price, 2.50 euros! So I grabbed one at half price, and left the other. I was so anxious to get in my workshop in the morning I couldn't wait, to start chopping that little table!
So as you see in the pictures I split the table into two halves. And then I picked some brackets that are similar to the Broder shelf brackets, and made some difficult for the average hobbyist machining, sawing and bending to have four "L" brackets with drill holes, so they can hold the shelves in total disguise like the original Lack Shelves.
They fitted like charm, and now I couldn't wait to go home and start the installation! Oh this was a very bad time so I had chosen a time that my fiancé was absent, a total mess!
First I took meters, and draw the points to drill. Then I started installing the "L" brackets. As you may notice under the "L" bracket I slipped a small L shaped bracket so I can use it to lock the shelf in place. After all this mess I had the two shelves installed and checked the alignment. Success!
That's it. Go on and chop those tables!!!
See more of the floating Lack bedside shelf.
~ mikenuke, Greece
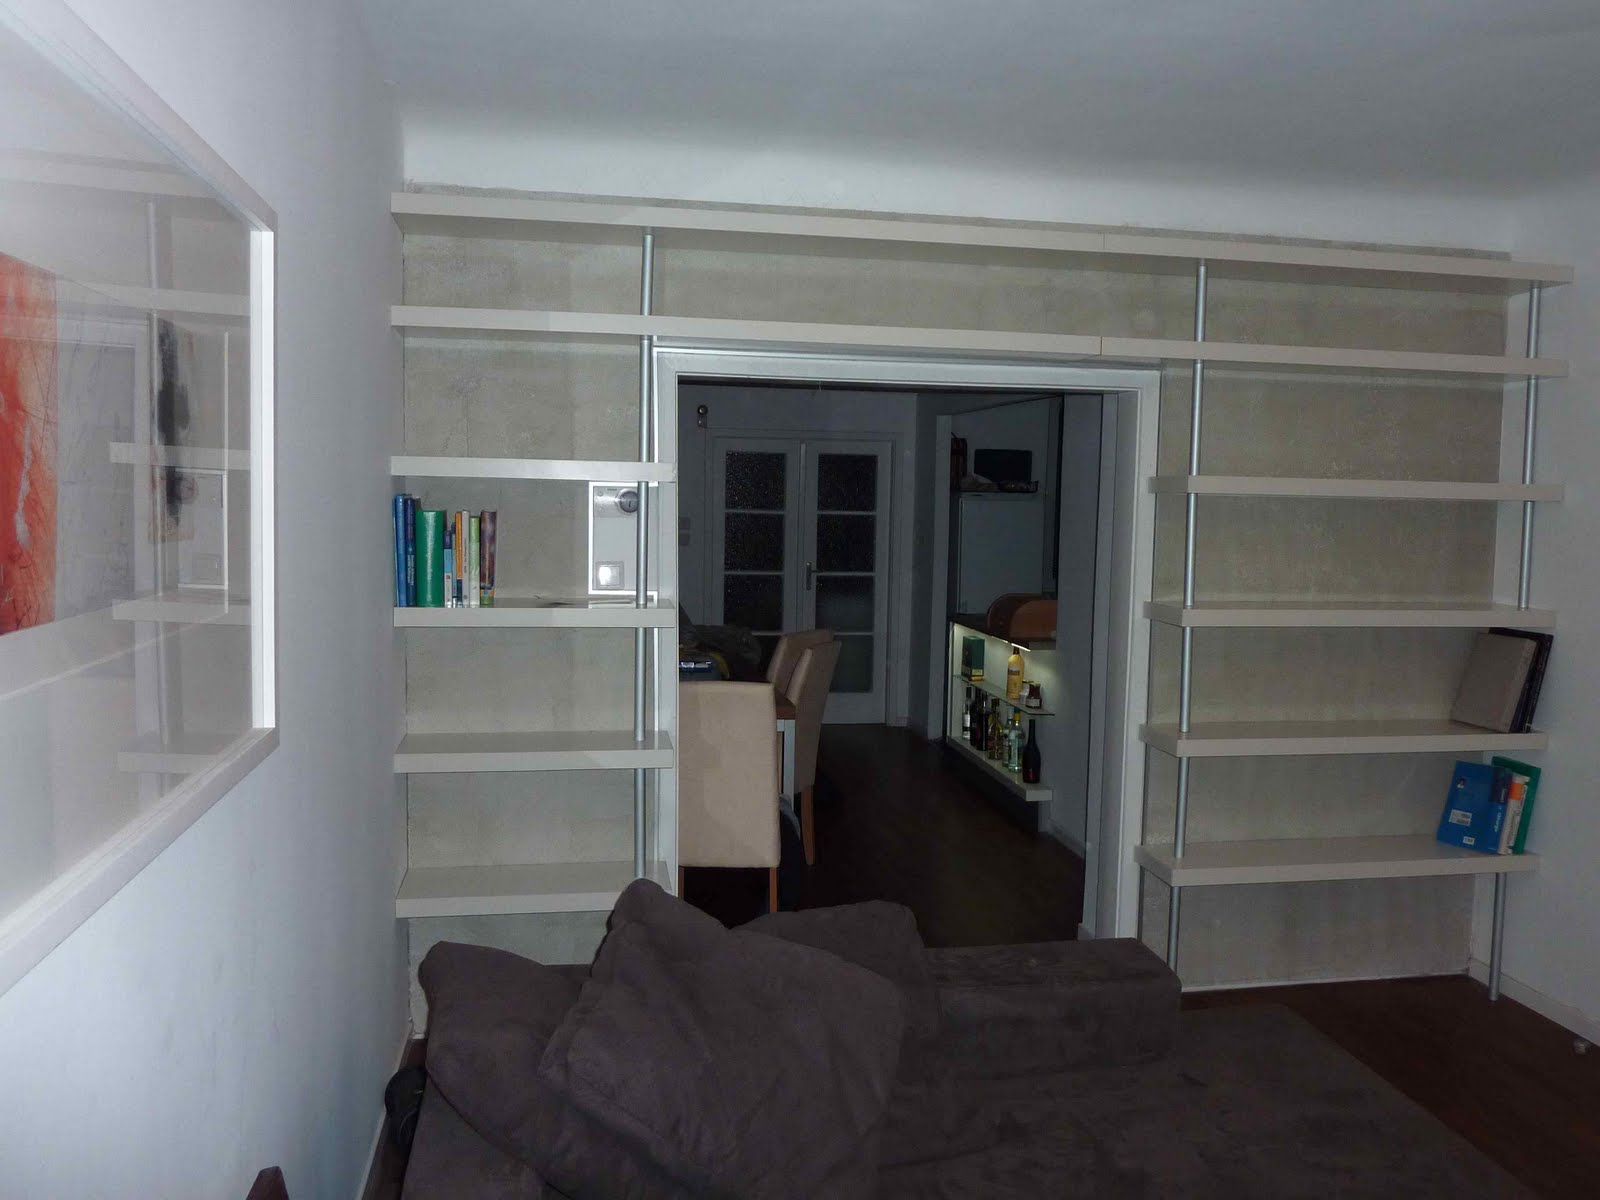
Lack Book shelf
Materials: Lack
Description: To construct the bookshelf I took several Lack shelves. The challenge was to cut them to the right size. Therefore, I had to remove the end-caps by heat and, after cutting, replace them.
To allow precise assembly I installed first a chipboard wall.
To achieve a higher weight tolerance of many books, I used aluminum pipes, placed as seen on the pics.
~ Alex Mildner
Lack with an ironing secret
Materials: Lack shelf, antique ironing board top, ironing board cover, 2 shelves from "as is" department, 2 bookends, graduated blocks of wood, black lacquer paint, L brackets
Description: I don't like setting up an ironing board and don't like the pull-down models, yet didn't have more than 10 inches clearance on the wall next to my small laundry center.
I found a Lack shelf still in plastic at the PTA thrift shop and, as it was the right size to fit in the space, decided to use it to hide an ironing board.
I found an antique wooden ironing board top made with one center board and two narrow side pieces. I pried off one of the side pieces and cut off the end to yield an ironing board top that would fit under the Lack shelf. I trimmed an ironing board cover and stapled it on the ironing board.
To make legs for the ironing board, I used L brackets to attach shelves to the bottom of the board at an angle. The shelves were from the "as is" department and originally from an unidentified Ikea item. The item is apparently graduated because the shelves' fronts are on a slant, which though not something I planned for works well with the design. I then mounted the Lack shelf to the wall just above the top of the ironing board.
To stabilize the legs I attached wooden bookends to the back of the legs at the bottom and graduated blocks of wood to the front, all painted with black lacquer.
When I need to iron, I pull the board out from under the Lack shelf and slide it over next to the dryer. I keep my iron on top of the dryer to make the set-up all the more handy.
~ Bess, Chapel Hill, NC
Labels:
Lack,
miscellaneous
Lack raised to the third
Materials: Lack TV bench
Description: We are baby-proofing our living room, and the baby gates are high enough that they block the line of sight to our television, which was on a plain Lack TV bench.
I loved the Lack-On-Lack TV benches, but we needed something at least 30 inches tall. I bought 2 additional Lack TV benches. I kept the legs on our existing unit, and added on top of it the 'box' to one Lack bench and the slap top of the third. Shelves between the pieces provided spacing. I used double sided foam tape to stick everything together.
Now the TV is hoisted up high enough that the baby gate doesn't block it, and it's a nice clean look.
~ Beth Quittman, Seattle
Labels:
Lack,
media storage
Kids Art Table, Ikea Style
Materials: Lack coffee table, Mala roll art paper, painter's tape, sandpaper, spray on primer, gray or black chalkboard spray paint, length of scrap wood for paper tearing edge, 6 washers, 2 wood screws, 7/8 in dowel rod, roll of art paper (picked up a few at Ikea), Levolor universal drapery mount
Description: I was inspired by this project on Martha Stewart's website to make a kids art table. On my recent trip to Ikea to get materials for the Lego table I made, I began eyeing the Lack coffee table. Using that as my base table, I wanted to refinish the top with chalkboard paint to make the art table even more useful.
Click to read more>>
Subscribe to:
Posts (Atom)