Showing posts with label children. Show all posts
Safe Bekvam step stool for toddlers
Materials: Bekvam step stool. 1.25 inch wood. 6 screws.
Description: PROBLEM
2 small children need to reach fragile modern glass bowl sink without injuring sink or themselves.
SOLUTION
- measure height of sink bowl.
- measure out the 1.25 inch left over wood into 3 pieces to arch over the sink to act as a handle for children perched on step stool.
- cut 2 vertical wood pieces and screw onto either side of step stool taking into account where the child will stand on stool. Mid way of top step should do it. Use 2 screws for each side and allow vertical wood pieces to touch floor to make it stable.
- cut last piece as top handle onto top of 2 vertical pieces and attach with 2 screws.
- sand off cut edges to round them.
- paint to suit.
This simple hack not only provides a safe solution for my kids but turns an inexpensive stool into a safer stool for adults that would cost way more for something comparative.
~ Peter Brunton, Orlando, Florida, USA
Trofast frames to play table
Materials: Trofast x's 2, mdf, connecting hardware, glue, nails
Description: We used 2 Trofast frames and put them together according to manufacturers instructions. We connect them together using connecting hardware. We then cut mdf top to fit over both units with some hang over on each side then we cut strips to nail/glue underneath top to keep top from sliding off.
See more of the Trofast play table.
~ Ed and Chris, Indiana
Double Bunk
Materials: MYDAL bunk beds x2, saw, drill, a few extra screws.
Description: My son wanted bunk beds; I wanted to keep a double bed in his room so it can house guests from time to time. First thought of a Double/Single TROMSO, but it's been out of stock for months and months. So I hacked a much more fun solution.
Two sets of IKEA MYDAL bunk beds assembled side by side as IKEA instructions except:
- Fit bed sides of upper bunks upside down (to make a flat platform)
- Only put guards up along the length of one set of bunks.
- Don't fit ladders or short guards.
- Don't complete the second lower bunk, leave out the outer long side and slats.
- Bolt the two sets together.
- Use the spare slats to fill in the gaps on one of the upper bunks (to make a solid bedside space)
- Build a wider and sturdier ladder out of all the unused parts.
- Cut down the short guards to accommodate the wider ladder and fit on the outer bunk.
It's not a space saving solution - it's vast, but my son loves it and so do I, both top and bottom are really special, cosy spaces.
~ Hannah Pepper, UK
Toy car from redundant Stuva legs
Materials: Stuva legs
Description: When you buy one Stuva wardrobe you get a whole box of redundant coloured legs. Mad to go straight to the bin.
They are perfect wheels though! Let your Kids built their own car with it.
I wish IKEA could supply a screw to support the axis too.
~ Lovala.com, Italy
Labels:
children
Fun Kura Makeover
Materials: IKEA Kura bed, fabric, Fabri-tac, shower curtain, shower curtain rod
Description: We loved the Kura bed, but the blue wasn't a good color fit for our soon-to-be four year old daughter's room. I had seen a couple of Kura hacks before, and knew that it could be done.
To cover the panels, I used three yards of a simple fabric in a color that I loved. Three yards turned out to be *just* enough without having to piecemeal any pieces together. I cut fabric from my yardage to the approximate size of the panels (just laid the panels on top of the fabric as a template), and then glued the fabric to the blue side. I had to trim really close to the edges to make sure that the cut ends didn't show on the inside of the panels...learned this the hard way.
After the bed was all put together, we added a curtain (made from a shower curtain) underneath the Kura bed. The length between the posts happens to be perfect for a shower curtain rod! She is ecstatic about her hideaway (a.k.a., the "princess fort"), and I'm ecstatic that I got to reclaim the floor space that her toddler bed was taking up in the room!
See more of the Kura makeover.
~ Kendra, PA
Malm + Bastis = Baby Dresser
Materials: Ikea Bastis, Ikea Malm
Description: We mounted a Dog Bed called Bastis (not available anymore) on to a Malm commode to get a Baby Dresser for our 2 Children. For a little Space between the Dog Bed and the commode we took some curtain rings.
~ Anke, Germany
Sniglar grows up too!
Materials: Sniglar changing table, saw, sanding paper
Description: Sniglar makes a great set of play tables when it's no longer needed for nappy changing!
Simply saw it in half, sand raw edges down, and voila!
We also screwed on (when it was used as a changing table) 2 Sigfried wooden brackets to the side to hold a plastic top and tail bowl, which works equally well as a toy/ bits and bobs bowl.
It also matches some of the other Ikea children's range, like the Mala easel.
~ Hettiella, Scotland
Woodland Inspired Rug
Materials: Hampen
Description: I can't take credit for the toadstools, I used a wonderful tute and I followed the instructions here using felt I had at home already, trimmed patches off the Ikea Hampen rug which was a bargain £10 and glue guned them in place.
It doesn't sound very technical now I've written it like that, but I absolutely love how it turned out!
See more of the toadstool carpet.
~ Nicola Ball, Hampshire
Hopen and Micke decoupage restyling
Materials: Hopen wardrobe, two little Micke desks
Description: Hi! I'm an architect and I love interior design and IKEA furniture. Sometimes I use to modify and personalize furniture by Ikea to adapt them to my projects...
Here you can give a look at one of my last works, the restyling of a children room. You can see a lot of furmiture by Ikea and the most beautiful ones are the one that I've modified with painting and decoupage. Micke desks and Hopen wardrobe!
If you want to see more visit my site about interior design.
This site is full of great ideas... i really like it!
~ Arch. Rachele Biancalani, Italy
Books, budgets and Bekvams
Materials: Ikea Bekvam Spice Rack
Description: It's a well known fact that I love blogs like I love my own children. A lot. And I see and get a lot of ideas. The "Miscellaneous" folder on my desktop is always full to the brim with inspiration, potential blog posts, things that I'm "going to do". But Ikea Bekvam Spice Racks as bookshelves? That had me clearing my diary and driving to Ikea the following day! Got kids? Cash strapped? Listen up.
Click to read more>>
Labels:
Bekvam,
children,
wall decor
Malm Changing Table
Materials: Malm dresser, wood boards, screws and glue
Description: Malm dresser can be used as a standard changing table and later as a normal chest. With 1m a perfect height to work (baby wrap) and with extra high side panels.
Malm with increased support for standard changing pads. (75 x 85 cm)
Both sides and head are connected with the board back
The cultivation is screwed on an angle on the rear wall of the chest no holes or screws on the top
On the sides, the Ikea trash and Ikea washing basin are appended. (I do not know the name)
If a station is no longer required, the additional bearing surface can be unscrewed easily.
~ Jens, Germany
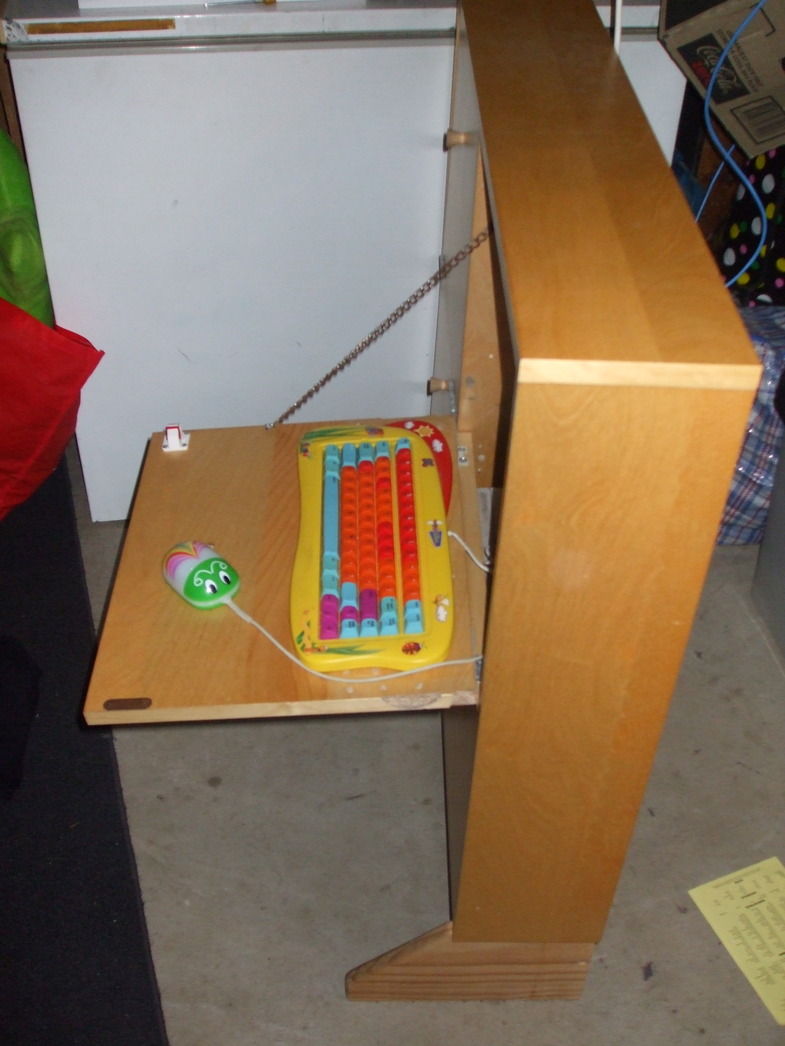
Kids Shoebox Dual Computer Cabinet
Materials: Sandnes Shoe Rack, Svala Chairs
Description: I worked out that the Sandnes show rack was a complete waste of time for storing shoes. With a couple of changes the unit makes an awesome computer cabinet for two small children 4-8 years old.
I am writing this almost 4 years after building it and about 6 months after I sold it. I can't find any pictures of the build stage, so I just have the ones I took when I sold it on Ebay.
I bought the Sandnes new, and put the frame of it together. Instead of using the plastic hinge parts, I connected normal door hinges on the center edge of the lower doors, and between the bottom and top doors on each side. This allows the top to lower as a keyboard shelf and the bottom opens to allow access to the main PC box for putting in CD's and turning it on.
I made a new back board which holds the monitors up. This was done by using the Ikea panel bolts and retainers on both sides of a sheet of 19mm Melamine chip board. The back only goes down about half way so the PC's still get plenty of air. I pulled the monitor stand apart and managed to fix them directly to the back board without buying a proper VESA mount, but you could do that if you wish.
As I was in a rental property, I did not want to attach the unit to the wall, So I rebuilt the legs to give some stability, but this would not be needed if you are happy to screw it to the wall as originally intended.
I attached the PC's by removing the top lid and putting screw directly through the base into the back of the lower door. The choice of PC is critical, as it needs to fit! Don't forget to allow for the plugs at the rear!
A piece of chain holds the top door in place just below horizontal. I did have the keyboard screwed to the door so the kids could not move them and they wouldn't scratch the monitor.
I installed magnetic child locks to stop the unit being opened without help as well as hold the top door shut. A barrel bolt was used to keep the bottom door shut.
A set of Svala chairs were just the right size to finish the unit off.
The kids loved this setup and it is a shame they grew out of it.
~ David Haddon, Brisbane, Australia
Gorm Bunk Bed Made in Italy
Materials: GORM
Description: Hello, I am Daniele Rossini (nickname MacGyver
I have a bedroom about 16 square meters and with two young children need two beds with a space that you desire, then I thought about a bunk bed, but not a normal one that measures 60 x 120 cm. I begin to think, imagine and measure the space without finding solutions ....... then I do not know why the port facilities Gorm with me, I take a pencil and paper and in the blink of an eye I'm holding the project I ran into the store and at a cost of about €60 I manage to buy Gorm shelves and uprights.
The frenzy runs through my blood and in three days, weather permitting after work, I transform the structures assembled together ...... and ualà!...... just what I imagined and so I wanted a bunk bed GORM sturdy and secure!
My children are happy with their new bed and I felt very happy but .... suggest the production of shelves 62cm, perhaps with factory waste and an instruction manual, ad hoc, bunk beds 60 x 120 cm can not be found!
As a child I played with Meccano 31 years now I'm not ashamed to play with GORM. Hello everyone and good life!
P.S. For those who want to achieve:
What you need:
-8 Pairs of uprights 174cm
-2 Pairs of uprights 110cm
-4 Shelves 77x51
-2 Shelves 77x31
-4 Pairs of caps.
Getting Started:
be sized from 77cm to 62cm shelves then the rest with a few tweaks and a jigsaw if it comes from ......... complete with adjustable sides!
Finished size:
Internal bed 62 x 133cm
external dimensions 66 x 135cm
Height 174 cm
~ Daniele, Italy, Rome
Kids Art Table, Ikea Style
Materials: Lack coffee table, Mala roll art paper, painter's tape, sandpaper, spray on primer, gray or black chalkboard spray paint, length of scrap wood for paper tearing edge, 6 washers, 2 wood screws, 7/8 in dowel rod, roll of art paper (picked up a few at Ikea), Levolor universal drapery mount
Description: I was inspired by this project on Martha Stewart's website to make a kids art table. On my recent trip to Ikea to get materials for the Lego table I made, I began eyeing the Lack coffee table. Using that as my base table, I wanted to refinish the top with chalkboard paint to make the art table even more useful.
Click to read more>>
Dolls house from a IKEA Catalogue
Materials: IKEA Catalogue, scissors, glue, cardboard
Description: We used last year's catalogue to cut and glue and make a dollhouse
See more of the IKEA Catalogue dollhouse.
~ Lilla a
Trofast play-table
Materials: Trofast wall storage, MDF board,
Description: Since I have kids, age 3 and 6. I have developed a special walking technique when it's dark at home. (All people whit smaller kids in the house will know what I'm talking about)
It is simple but effective; you drag your feet along the floor. The aim is to avoid something sharp getting in-between your feet and the floor! Like a toy.
If this happens you will end up with a sharp pain in your foot or you break you kids favorite toy or both.
To avoid having to re-finish the floor every month I had an idea about a play-table. OK the idea is obviously not mine. You can buy these things
So what to do? Well you build it yourself!
I started of by measuring the room to decide how large the table top could be after this I looked at the Trofast series. I wanted something that wasn't too high so I decided to go for the wall mounted one, or rather two of them. I cut a MDF board (12 mm) into table top and some edges and also a base for the Trofast frames to stand on.
It took some time to fix the edges (glue and screws) and to sand them down so they where a bit rounded.
After this I mounted the Trofast frames and removed the plastic edges so that the frames could be fixed tightly to the base and table top. Then I mounted the legs.
To dampen the sound I glued a fabric on the table top and then I just painted the edges.
The remarkable thing is that most of the toys stay on the table or in the storage boxes! Our vacuum cleaner bag will last double the time since it's not full of dust and lego and small wooden train parts.
~ BR Richan, The land of IKEA, SWE
Subscribe to:
Posts (Atom)