Showing posts with label Gorm. Show all posts
The Gorm Sewing Table
Materials: Gorm shelf, racks, Trofast storage boxes, screws, L brackets, etc.
Description: We needed a sewing table and a place to use our laptops in the study room. Popped by Ikea and got a sudden inspiration with Gorm Shelves.
The table top would be made by joined 2 pieces of 83cm by 50 cm gorm shelves. (Have to remove the plastic at the side)
Table legs at 2 sides:
- 1. An L shaped table leg form by 2 gorm shelves.
- 2. A set of drawers using Trofast drawers and Gorm shelves as the structure.
Steps:
1. Join up the L shaped table legs, fairly easy by joining the 2 gorm shelves with L brackets.
2. Fix the L shaped table leg to one side of the Gorm table top.
3. Fix up the Gorm shelves to form the structure for Trofast boxes. We had extra slides from our Trofast boxes. Quite some trial and error here.
4. Join up the drawers above to the other side of the Gorm table using L brackets.
5. Join up the 2 sides of the Gorm table top. (See pic). Further strengthen it with 2 extension Gorm post.
6. Painted the top white and there u go!
See more of their home renovation.
~ Gim and Elsie, Singapore
Labels:
Gorm,
work station
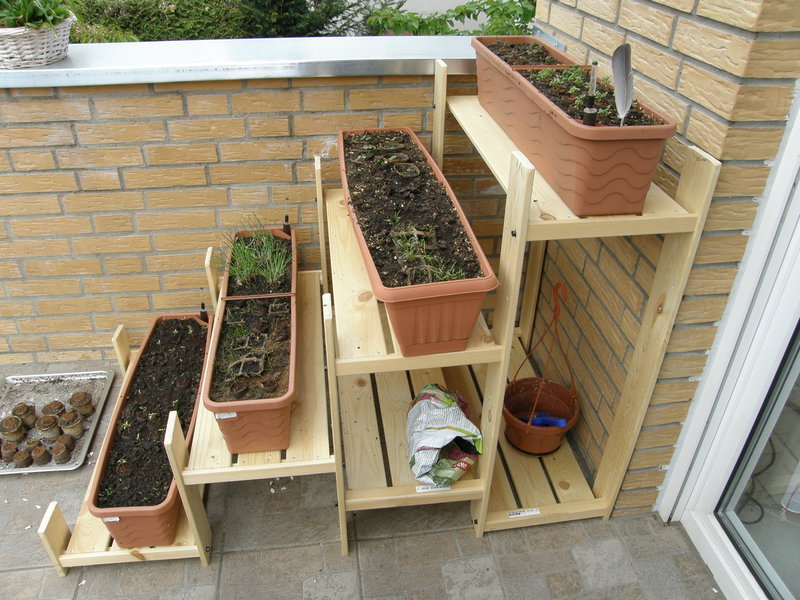
Herbal Regal for the Terrace
Materials: GORM and any tools
Description: So I made from the GORM a stairs for our herbs at the terrace
~ Frank Bendig, Germany Berlin
Bottle Rack to Side Table
Materials: Gorm Bottle Rack
Description: I wanted a side table which I just couldn't find. I wanted it hanging instead of being on the ground. So I took this useless wine rack (Gorm bottle rack) and made one!
You can find step-by-step pictures on my flickr set.
~ shoxcorp, The Netherlands
Gorm Bunk Bed Made in Italy
Materials: GORM
Description: Hello, I am Daniele Rossini (nickname MacGyver
I have a bedroom about 16 square meters and with two young children need two beds with a space that you desire, then I thought about a bunk bed, but not a normal one that measures 60 x 120 cm. I begin to think, imagine and measure the space without finding solutions ....... then I do not know why the port facilities Gorm with me, I take a pencil and paper and in the blink of an eye I'm holding the project I ran into the store and at a cost of about €60 I manage to buy Gorm shelves and uprights.
The frenzy runs through my blood and in three days, weather permitting after work, I transform the structures assembled together ...... and ualà!...... just what I imagined and so I wanted a bunk bed GORM sturdy and secure!
My children are happy with their new bed and I felt very happy but .... suggest the production of shelves 62cm, perhaps with factory waste and an instruction manual, ad hoc, bunk beds 60 x 120 cm can not be found!
As a child I played with Meccano 31 years now I'm not ashamed to play with GORM. Hello everyone and good life!
P.S. For those who want to achieve:
What you need:
-8 Pairs of uprights 174cm
-2 Pairs of uprights 110cm
-4 Shelves 77x51
-2 Shelves 77x31
-4 Pairs of caps.
Getting Started:
be sized from 77cm to 62cm shelves then the rest with a few tweaks and a jigsaw if it comes from ......... complete with adjustable sides!
Finished size:
Internal bed 62 x 133cm
external dimensions 66 x 135cm
Height 174 cm
~ Daniele, Italy, Rome
Going industrial: BRODER-GORM shelving
Materials: BRODER poles, GORM shelves
Description:
1. Cut the GORM shelves to wanted length.
2. Paint, stain or wax the shelves to wanted color.
3. Put the system together.
Easy hack to a cool industrial look bookshelf. Why GORM shelves? Because they are cheaper and have a wine bottle rack!
Total cost around 100 dollars.
~ Akseli Virtanen, Helsinki, Finland
Gorm window sill
Materials: Gorm, Behandla
Description: My wife and I always wanted a window sill that doubles as a bench. The only problem is that the required wood was to expensive. Then I thought of Gorm, the cheapest shelving unit from Ikea.
I used 8 Gorm 50 cm shelves and 8 height extension posts. First I painted them white using Behandla. I sawed them to a breadth of 35 cm. And used the sides to connect the boards to the window frame.
The extension posts are used as legs.
~ Christiaan, Holland
Dolly bunkbed
Materials: gorm shelves
Description: I decided to make a dolly bunkbed for my daughter's dollies by using two sets of Ikea gorm height extension posts and two short three plank gorm shelves. Simply made two mattresses out of fabric scraps bound with the Ikea iron-on hemming tape and filled with polyfill. The blankies were cut from an old Ikea fleece blanket. My daughter's pretty chuffed with them, alright!
~ Izreen Ismail, Kuala Lumpur, Malaysia
Gorm (almost) cabinet
Materials: Gorm shelf; Vitaminer Rand fabric; Behandla paint; some plywood (not Ikea)
Description: My son (9 months old) loves to open and close doors.
I put in his room an old, little ( 61 cm) Gorm shelf, with two shelves, painted in red (Behandla paint, of course!): but shelves don't have doors!
So I found in my lab a couple of pieces of plywood 3 millimeters thick, and I cut out a back panel, which I nailed to the shelves' back side.
I cut out two plywood panels, 15 mm thick, and hinged them to the front legs of the shelf.
Last, I painted everything with red Behandla.
My wife cut out two pieces from a Vitaminer Rand fabric, hemmed them and then I nailed them on the two sides of the "cabinet".
Finished!
~ Marcello Racchini, Lissone (MB), Italy
Lay-away your endless cardboard!
Materials: 5 Gorm 1'x3' shelves, hand saw, mallet, workbench vise, electric screw driver, 14 drywall screws, 4 'dowel' screws, 2 wall anchor screws, wood glue
Description: Shelf Your Recyclable Cardboard... with this quick, fun project: Storage and binding station for your pantry, mud room, or garage.
Assembly time was about 2 hours:
1) Set aside (intact) 4 of the 5 Gorm 1'x3' shelves.
2) Using a workbench vise (or a work table and a clamp) with a hand saw, cut off 1 of the 3 slats that make up a 1'x3' Gorm shelf section. Do this as follows.. this the only challenging part of this project!:
a)clamp down the shelf so that a 1' long edge is on horizontal to you and on top, and the 3' sides are vertical. b) Refer to the attached pictures ("Gorm 1ftx3ft shelf.jpg" and "Cardboard recycler_Side view.jpg")
You will be cutting the L-shaped molded edge piece and not the slat itself: Locate the first 'gap' between the slat you are removing and the middle slat. c) now angle the hand saw blade so that you are cutting the L-shaped molded edge from against the slat you are 'keeping' outward to up against the middle slat. d) Turn over and clamp down the 1'x3' Gorm shelf section and do the same cut to the other L-shaped molded edge on the other side -- but make sure to have the angle of the saw blade and the cut itself match the direction of the cut done in able step c. That done.. the 'difficult' part of the project is complete!
Click to read more>>
Good ol', cheapo upholstered Gorm Bar
Materials: Gorm Posts, Gorm Shelves, Gorm Corner Shelf
Description: This is I and my husband's first hack. After weeks of trawling through this site, I managed to convince DH that building our own bar would be cheaper than buying a new one.
We wanted an L shaped bar and thought about using expensive IKEA pieces for this, but settled for good ole, cheapo Gorm.
Supplies:
2 51cm GORM corner shelves - $26
8 51 x 77cm GORM shelves - $56
8 31 x 77cm GORM shelves - $40
24 packs of 110cm GORM posts - $96
Packet of screws - $9
Fabric - $16
13mm MDF sheets for the top of the bar - $13
Staple gun and staples
Hand drill
Total: $256
Click to read more>>
A Gorm guitar shelf
Materials: Gorm
Description:
This guitar shelf took me about 3 hours to make from the shelves I bought in IKEA. The main step is making the original shelf into the way that you can see in the picture above.
And there's a important point on this guitar shelf that's how it was done completely. To buy a bottle shelf and place it on the bottom. Then you can just put 8 guitars or basses you want. By the way, these all cost me $1000NT.
See more of the guitar shelf.
~ herguitarcraft
Subscribe to:
Posts (Atom)


