Showing posts with label shelves. Show all posts

Lack Library and Gallery Hack


Materials: Lack 43" and 74" Shelves

Description: I wanted an open library to house a lot of books and have room for art exhibition as well so I started researching LACK shelves. Reviews were mixed as to amount of weight they can handle so I determined I had to attach to minimum of two studs. US studs are 16" apart and on the 74" shelves, there are NO multiples of 16" from any other holes so I
1) confirmed stud location on the wall (and distance between)
2) measured and marked future holes on the rails which I then drilled.
3) Attached rails to studs.


For most cases I was able to hit 3 studs on both lengths of shelves. I'm really satisfied with the results though I might have to add the occasional L-Bracket for some of the shorter shelves that want to dip downwards somewhat. I'm still picking paintings and statuary for the open spaces in the design.

~ Amy S, Portland, OR USA

Ikea Lack table into Lack floating shelves!


Materials: Lack table, brackets (Dormer type probably or any other), L brackets, screws, saw, drill

Description: We wanted two side-tables for the bedroom, but we thought that it would be more convenient to be the floating type like the IKEA Lack floating shelf. So the next day I visited IKEA store, and tried to find one that would be matching the space in size. Unfortunately I realized that the Lack shelves are only made 110cm and 30 cm long and there is nothing in between, which would fit for my needs. So I had a brilliant idea! Why not make my shelves by cutting into half an IKEA Lack table which only costs 5 euros!


So on my way to the cashier with a black Lack table, I stepped in to the "as is" department and the exact time there was a batch of ex-display tables for half the price, 2.50 euros! So I grabbed one at half price, and left the other. I was so anxious to get in my workshop in the morning I couldn't wait, to start chopping that little table!


So as you see in the pictures I split the table into two halves. And then I picked some brackets that are similar to the Broder shelf brackets, and made some difficult for the average hobbyist machining, sawing and bending to have four "L" brackets with drill holes, so they can hold the shelves in total disguise like the original Lack Shelves.


They fitted like charm, and now I couldn't wait to go home and start the installation! Oh this was a very bad time so I had chosen a time that my fiancé was absent, a total mess!


First I took meters, and draw the points to drill. Then I started installing the "L" brackets. As you may notice under the "L" bracket I slipped a small L shaped bracket so I can use it to lock the shelf in place. After all this mess I had the two shelves installed and checked the alignment. Success!

That's it. Go on and chop those tables!!!

See more of the floating Lack bedside shelf.

~ mikenuke, Greece

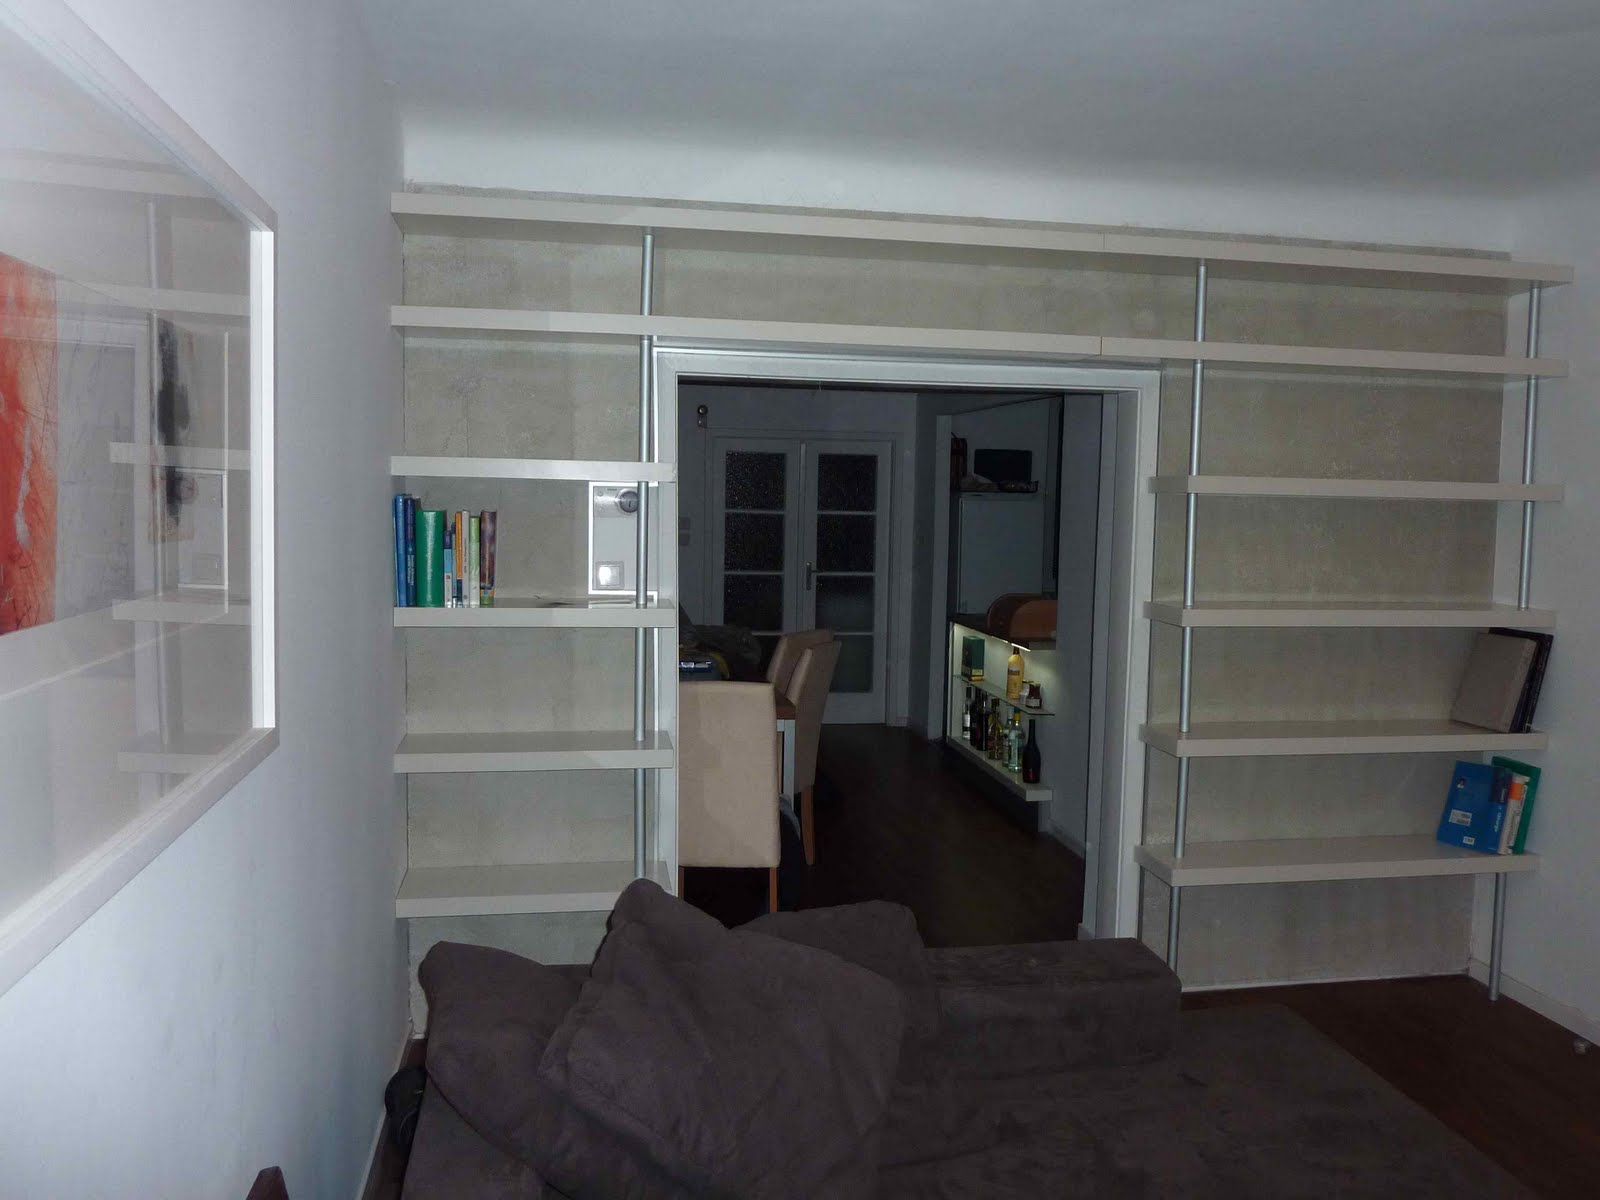
Lack Book shelf


Materials: Lack

Description: To construct the bookshelf I took several Lack shelves. The challenge was to cut them to the right size. Therefore, I had to remove the end-caps by heat and, after cutting, replace them.


To allow precise assembly I installed first a chipboard wall.

To achieve a higher weight tolerance of many books, I used aluminum pipes, placed as seen on the pics.

~ Alex Mildner

Going industrial: BRODER-GORM shelving


Materials: BRODER poles, GORM shelves

Description:
1. Cut the GORM shelves to wanted length.

2. Paint, stain or wax the shelves to wanted color.

3. Put the system together.


Easy hack to a cool industrial look bookshelf. Why GORM shelves? Because they are cheaper and have a wine bottle rack!

Total cost around 100 dollars.

~ Akseli Virtanen, Helsinki, Finland

Chachut


Materials: Not, Mammut

Description: I had the NOT lamp and the MAMMUT shelf for a long time by my bed as a reading light and book shelf, one day I accidentally knocked the lamp down and broke its standing pole.

Instead of throwing it away I decided to attach the lamp to the shelf to maintain the same function as before.


The process was quite straight forward, the shelf opens into two parts so all the cables can be hidden inside, I drilled holes for the lamp poles and cables and that was it.

~ Daniel Metcalfe, IT

LACK side table to shelf hack


Materials: 4 LACK side tables, a broomstick

Description: During remodelling I was in need of a shelf to be placed beside my bed. It should hold my alarm clock, the entertainment center and some other stuff.

Not finding anthing I like and not wanting to spend money into something I dislike I almost left IKEA empty handed.

Almost leaving, but then found a special offer of LACK: 1,99 Euros (about $ 2,60) a item. The hidden price to pay was to become used to the ugly light blue color.

So this really simple hack is made of 4 LACK side tables with three legs attched. I used MS Polymer to glue the table legs on the desk top.

Not shown is a vertical attached broomstick that is screwed to the table tops at the far end side. The broomstick is strapped to a hook in the wall.

The result does not look too ugly and is even cheaper than Hyllis (4 LACK: 7,96 Euro, 1 Hyllis: 7,99 Euro).

~ Holger, Germany

Billy bookcase redux


Materials: Billy bookcase, wrapping paper, mod podge

Description: I've posted all the instructions and step by step photos here.

See more of Sharon's Billy bookcase

~ Sharon Pakir, Melbourne, Australia

Wall Heater Cover/Bookshelves


Materials: Lack Wall Shelves, Ekby Jarpen Wall Shelves, Ekby Bjarnum Brackets, Tundra Laminate Flooring, Nails, Glue, Aluminum Strip and Plywood

Description: This was a two-fold solution. We wanted to cover our hideous wall heater and needed some sort of storage. We initially had a Expedit shelving unit, but it was a bit bulky. So...here are the steps.

1. Frame out desired area using Lack shelves.


2. Attach plywood to wall (we rent, so we wanted to make this removable without having to do a ton of repair work which would be required if we attached flooring directly to the wall).


3. Glue laminate flooring to plywood.


4. Cover any exposed edges of plywood and laminate flooring with aluminum corner strips. (You can see ours on the right-hand side of the unit where it butts up to the door.)

5. Hang shelves.


6. Decorate!

Oh, and we used a panel from a folding screen I got a few years ago from West Elm. Another idea might be some sort of mesh wiring. Really, anything that would cover over the hideousness without decreasing air flow.

~ Ryan & Lizzie Lewis, Santa Monica, CA

Greek Pi shelf


Materials: 3 Lack shelves, glue, saw.

Description: Building this small book shelf requires three Lack shelves.

The first step is to decide the height of your book shelf. Keep in mind that books and magazines are 25 to 30 cm tall.

Cut one of the Lack shelf (starting from both ends) the two pieces that will form the pillars of the book shelf.

Glue the outer surface of the pillars on the base, then glue the top on the uprights.

Your Greek Pi shaped book shelf is done.


You can equip the book shelf with legs (I used some large Ikea balls) or use the Lack brackets to hang it on the wall (without loading too much).

~ Marco, Rome, Italy

Multiple Rast Trofast substitute


Materials: Seven Rast bedside tabels, wood panels, glue, screws, drill, wood dowels, paint. Optional: Trofast boxes, Mackis drawers.

Description: With our two young kids, we needed storage for toys, books and art supplies. I wanted to match a high and narrow built-in bookcase on the opposite wall. Unfortunately the size of the Trofast cabinet wasn't ideal, and I though it a bit too expensive. So I used five Rast bedtables to make a high and slim floating bookcase where the old mantelpiece used to be.

I attached the five Rast bedtables to each other with wood dowels and glue, then glued and screwed them to a wood panel on the back - since the wall was bent. Hung the whole thing on the wall with several screws and plugs. After some time I added a second smaller cabinet made from two Rast bedtables for extra storage.


The size is perfect for Trofast boxes, and the floating setup makes it light and airy, and easy to clean underneath. Only downside: the Rast tables are not high enough inside to accommodate our collection of foto albums, at least not upright.


(Note: The wall shelves are Fabian shelves, placed in a rhythmic pattern.)

~ G.V.M., The Netherlands

Suspension Bridge Shelf


Materials: MARKOR series home entertainment combo plus EKBY BJÄRNUM wall shelf bracket; Extra shelves from the "as is" section; castors on the coffee table so the footstool can live underneath


Description: Mounting the bridge shelf to the wall above the TV was proving more difficult than we thought... We came up with an elegant solution without having to drill holes in the wall! Using the EKBY wall shelf brackets mounted to the sides of the MARKOR bookcases as the "towers" the bridge shelf just sits on top. Simple!


We also added extra shelves to the bookcases from the "As Is" section to hold more DVD's and castors to the MARKOR Coffee Table so the KARLANDA footstool can live underneath.

~ Michael and Tim Granados, Edinburgh, Scotland

Custom-made bookshelf wall


Materials: Billy bookshelf

Description: When I moved in here I hade several old Billy shelves in a dark reddish colour that didn't match the new place. I also needed more shelves than I had for all my books.

With some help I dismantled the shelves, and sawed away the part where the backside is. Doing this shelves and sides got the same depth. Also painted them white.

We then screwed the sides to the wall and added the shelves, to get more parts I bought Billy tops. Some of the shelves are placed using the old holes, other are screwed into place.

All that is missing is a list at the top to make it look built in.

~ Jessica, Sundsvall, Sweden

IKEA shelf-evators


Materials: Capita legs, Ekby Viktor shelves, Ekby Joxa bracket rail

Description: I recently took a job teaching online in which I work from home, meaning I needed to convert part of my living/dining room into a home office. My biggest problems were accommodating my extensive library of academic books, and finding space for easily-accessed office supplies.

The 28-inch wide (non-IKEA) bookshelves near my dining table, which is now my primary workspace, were only two shelves high. After filling them with books and stacking another row on top, I realized there was still plenty of room above the top row of books if only I had free-standing shelves (or, as I came to think of them, "shelf-evators) to go over the top. I didn't want to screw anything into my walls; I wanted something to rest on top of the bookshelves. I asked the employees at IKEA who said they didn't have anything suitable, but had sometimes used Capita legs and single wall shelves to make something similar for a display.

Ekby Viktor shelves were the obvious choice, since their dimensions were very close to the dimensions of my existing shelves, and they were cheap, only $5.99 each. The problem was that Capita legs are a maximum of 8 inches tall, whereas many of my books were 10 or 11 inches tall. I decided to find something in the as-is bins that I could use to increase the height of the legs before adding the shelves on top.

I found the perfect thing - two Ekby Joxa rails, essentially strips of 1x1 already painted black, marked at $2.50 each. Add two packs of 8-inch Capita legs at $14 each, and some Gorilla wood glue from the hardware store, and I had my hack ready to go.

Click to read more>>

Check out this stream