Showing posts with label furniture. Show all posts
Lack small side table with shelf
Materials: Lack side table white (55*55*45)
Description: We needed a small table next to the couch. We bought a Lack side table and built a smaller shelf underneath.
We put the shelf together with L-shaped mounting bracket.
When we put the Lack in ordinary position it didn't show. A hidden shelf to put your remote controls!
~ Zanna, Sweden
Lack and Vika Amon Sideboard
Materials: 4 LACK side tables, 1 VIKA AMON table top
Description: The LACK side tables were assembled first and 2 of them were attached using L flat brackets to form one row. Next, they were attached to the VIKA AMON table top using eight 2.5" screws with washers.
They were placed upside down to use my weight to clamp them down firmly.
Once the VIKA AMON table top were attached, it was time to attach the lower row. I used flat metal brackets from GORM to fix them together. One is used on each leg at the back side. 2 pieces were also used to further strengthen the hold between the VIKA AMON top and the tables.
Since I plan to have plaster or gypsum boards covering the sides and back of the sideboard, I used L brackets to attach the top and bottom row, facing inwards. In the picture they look brass, maybe they are.
This is my first wood project since I was in high school so I'm proud of it even if it's very simple.
Enjoy!
See more of the Lack and Vika sideboard.
~ Ady Romantika, Malaysia
IKEA Lack-console table
Materials: Lack table, shower curtain, contact glue
Description: Old and in poor condition Lack-console table. Covered with the table top and legs using a pixel pattern shower curtain.
Before: Surface worn and scratches...
Traditional painting instead I decided to glue an extra leftover shower curtain on the table :)
AFTER: My new shiny desk :)
~ Maija, Lahti, Finland
Cupboard + brackets = table
Materials: Lottorp bracket, Ikea bargain section cupboard door
Description: This has to be the cheapest quickest table you can make from Ikea stock.
First of all I found a cupboard door, there were lots to choose from in the bargain corner of my local Ikea and the one I got only cost £1.63.
Next I took four Lottorp wall brackets £0.83 each and assembled them.
I then marked out and attached the four brackets to the under side of the cupboard door with eight screws.
From here you could say it was finished but me and my girlfriend decided it could do with a lick of white emulsion.
And tada nice white coffee table made 100% from Ikea products for under a fiver.
~ mark john carrol, greater manchester
Labels:
furniture
Lack Lazy Susan Coffee Table
Materials: Lack Side Table Legs and Lazy Susan Table Tops
Description: This creation was inspired by the 24 left over Lack Side Table legs I had after I created a headboard for my King size bed (See the post entitled "Headboard fit for a King-sized bed" for more details on that project).
This table took a couple of sequential steps before finally assembling each piece to form the final table.
First I designed three "+" shaped legs using five Lack Side Table legs, per leg and used double sided carpet tape to hold each "+" shape secure.
For each "+" table leg, I cut out a 7" diameter piece of MDF and attached each "+" leg to the MDF using 14 x 1" flat head screws after pre-drilling with a countersink bit. I used metal brackets on the opposite side of the "+" legs to secure the whole leg together.
I designed the table base as a double layered, offset "T" shape using eight table legs (four sections grouped into twos).
I slotted the "+" legs into the "T" base and used 14 x 3 1/2 " round head screws to attach each section (I also spray painted 1/4 washers with a flat black spray paint and bought black screw caps to mask the round head).
I then turned the whole structure on its head, and slid the Lazy Susan tops underneath, attaching them to the 7" diameter MDF.
This project used a total of 23 Lack Side Table legs and three Lazy Susans. The reason I used 14 (width size) screws is because the pre-drilled holes in the Lack legs were sized at a 14 width.
It took a lot of preplanning and forethought to assemble this coffee table, but being my first ever built piece of furniture, I'm very proud of it.
Hope you enjoy.
~ Doug Lu, Ontario Canada
Labels:
furniture,
Lack,
living room,
Snudda
Forhoja Side Table
Materials: Forhoja wall cabinet; Capita 6" legs
Description: Looking for a small side table with some storage space. Couldn't find one I liked.
I found the Forhoja wall cabinet, part of the kitchen organization section. It's just an open cube, to which I attached 4 Capita legs. I like the way one side looks like a robot.
~ Rebecca, NYC
Coffee Table Train Set
Materials: Liatorp Coffee Table
Description: The hack includes the Liatorp coffee table with glass top and pull out drawer that was modified to include an N scale model train set.
I didn't like the white so I painted about 95% of it black. Four coats of satin black furniture paint to be exact. I left the shelf that the drawer slides on unpainted for two reasons. One, the paint would just rub off as the drawer glides back and forth over the shelf. Two, simply to provide a highlight color to offset all the black. The last thing cosmetically, was I purchased two new pull knobs for the drawer as the stock ones did not match the black.
The drawer from the factory includes a cross in the middle of the drawer making four available compartments, and two particle board pieces that make up the drawer bottom. Now obviously this won't work if you plan to utilize the entire space in the drawer. Leaving out the cross was easy but by doing so, the bottom particle board pieces are rendered useless. So I need a floor for the drawer. I took the necessary measurements and made my way over to TAP plastics, had a custom floor made, and I was good to go.
After assembly, the only thing left to do is design the train layout. I used a program called AnyRail available at anyrail.com. Once the layout is set, it's just a matter of purchasing the engines, cars and scenery that you like to complete the look. Since this was my first attempt, I spent a little more than I probably would have liked but I think it was worth it. It's definitely a conversation piece and fun to look at.
To see a video of the trains in action, check out this youtube video.
Re-Purposed BRATTBY Kitchen Cart
Materials: BRATTBY Kitchen Cart, Primer and Paint in One, Drawer Knob
Description: We removed all the shelves except the bottom one (for support) from the BRATTBY kitchen cart, then removed the back wheels and cut the front legs of the cart to make all four legs even. I lightly sanded the cart, filled in any holes and imperfection with spackling paste and painted it with primer and paint in one. I drilled a hole in the drawer and added a decorative knob. Now our 5 year old kitchen cart is a brand new living room side table!
See more of the repurposed kitchen cart.
~ Adriana, Southern California
That's a wrap - coffee table
Materials: Lack coffee table, Mod Podge
Description: The finish on this coffee table had a way of collecting and showing off dust, fingerprints, and crumbs like you wouldn't believe. It was driving me nuts so I decided to decoupage the top to add color, texture, and dimension to an otherwise boring table.
1. Use heavy-weight gift wrap,the non-shiny kind you buy by the sheet works really best for this project. Measure and cut to cover the surface of the table.
2. Gather your mod podge supplies. You will need a foam brush, a high-density, ultra smooth roller, a container to pour your mod podge into, and a damp cloth for wiping away extra glue.
3. Carefully roll on a thick coat of mod podge with the roller. Working quickly, start at one corner and line up your paper with the edge of the coffee table and carefully unroll it on to the layer of glue. Using your hands, smooth away any wrinkles or bubbles that appear on the surface. If you notice your glue is drying before your paper goes down, try working in smaller sections using the foam brush to get between the paper and the table as you unroll it and press it down.
4. Wipe away any excess glue and let dry for 30 min. Add 2 more coats of mod podge letting it dry completely between coats.
5. Finish off the table with a coat or two of polyurethane using another high density foam roller and you're done!
See more of the decoupaged coffee table.
~ Jennifer, Seattle, WA
Labels:
furniture,
Lack,
living room
Mythic Star Lack table
Materials:
-LACK table: 1 white and 1 black
-adhesive paper, black and white
design and model-cutter
-hook
Description:
Cut the different parts of the design and position on the floor, mount one leg of a different color to the table at the drawing.
If you remove the legs and fix a hook, you get two decorative panels to be put on the wall.
~ Irene Vergnano, Roma Italy
Tiling a Lack Side Table
Materials: Lack Side Table, Tile, Adhesive, Grout, Trowel, Float
Description: I found a simple, and inexpensive, way to spice up the $7.99 Lack Side Table. Once you gather all the necessary tools, follow these easy steps!
Step 1: Clean off the surface, and make sure it is completely dry.
Step 2: Measure out your tile. Since my table surface was a little smaller than the 4 (12x12) sheets of tile, I had to trim off some of the edges. But these glass tiles were incredible easy to work with and I just had to cut through the netting that attached them.
Step 3: Once you have the correct amount of tiles, it's time to lay the adhesive. Since I was working with a relatively small surface area I didn't have to worry about my adhesive drying, so I spread on enough to cover one sheet of tiles. I used a paint stir stick to grab some adhesive, and then used the trowel (metal thing with notches) to spread it out evenly. I went over my patch of adhesive with the notched side to make the lines in the adhesive.
Click to read more>>
Klimt Lack
Materials: Lack side table
Description: My Lack table was too green for my room,so I decided to add it a little color- painted the top and the sides white in two layers, put a Klimt
~ Pera Peric, Kragujevac,Serbia
IKEA LEGO Table
Materials: Ramvik
Description: When I moved in I bought an IKEA Ramvik table and while travelling this summer I had an idea (don't ask why): decorate its top with Lego bricks used as pixels. Here are the steps I went through. If you don't care about those steps and want to see a nice time-lapse video, scroll to the end of the article!
Lego bricks
First things first. What are the Lego brick sizes and colors available? Oddly enough this question is not that easily answered. Probably because Lego's site is crappy, or because nobody really cares... I eventually found Brickipedia which happens to be a much richer resource than the official ones. Everything I was looking for was there: the Lego "unit" is 8 millimeters and the color palette is pretty simple.
Table specs
Knowing my table size I had various options, depending on the "pixel size" I'd choose. Of course the number of bricks (and the price) would also vary. So I created a dynamic spreadsheet on Google Docs that'd do the calculations for me...
I chose the 4x4 option, quite cheap and still offering a cool number of pixels.
Click to read more>>
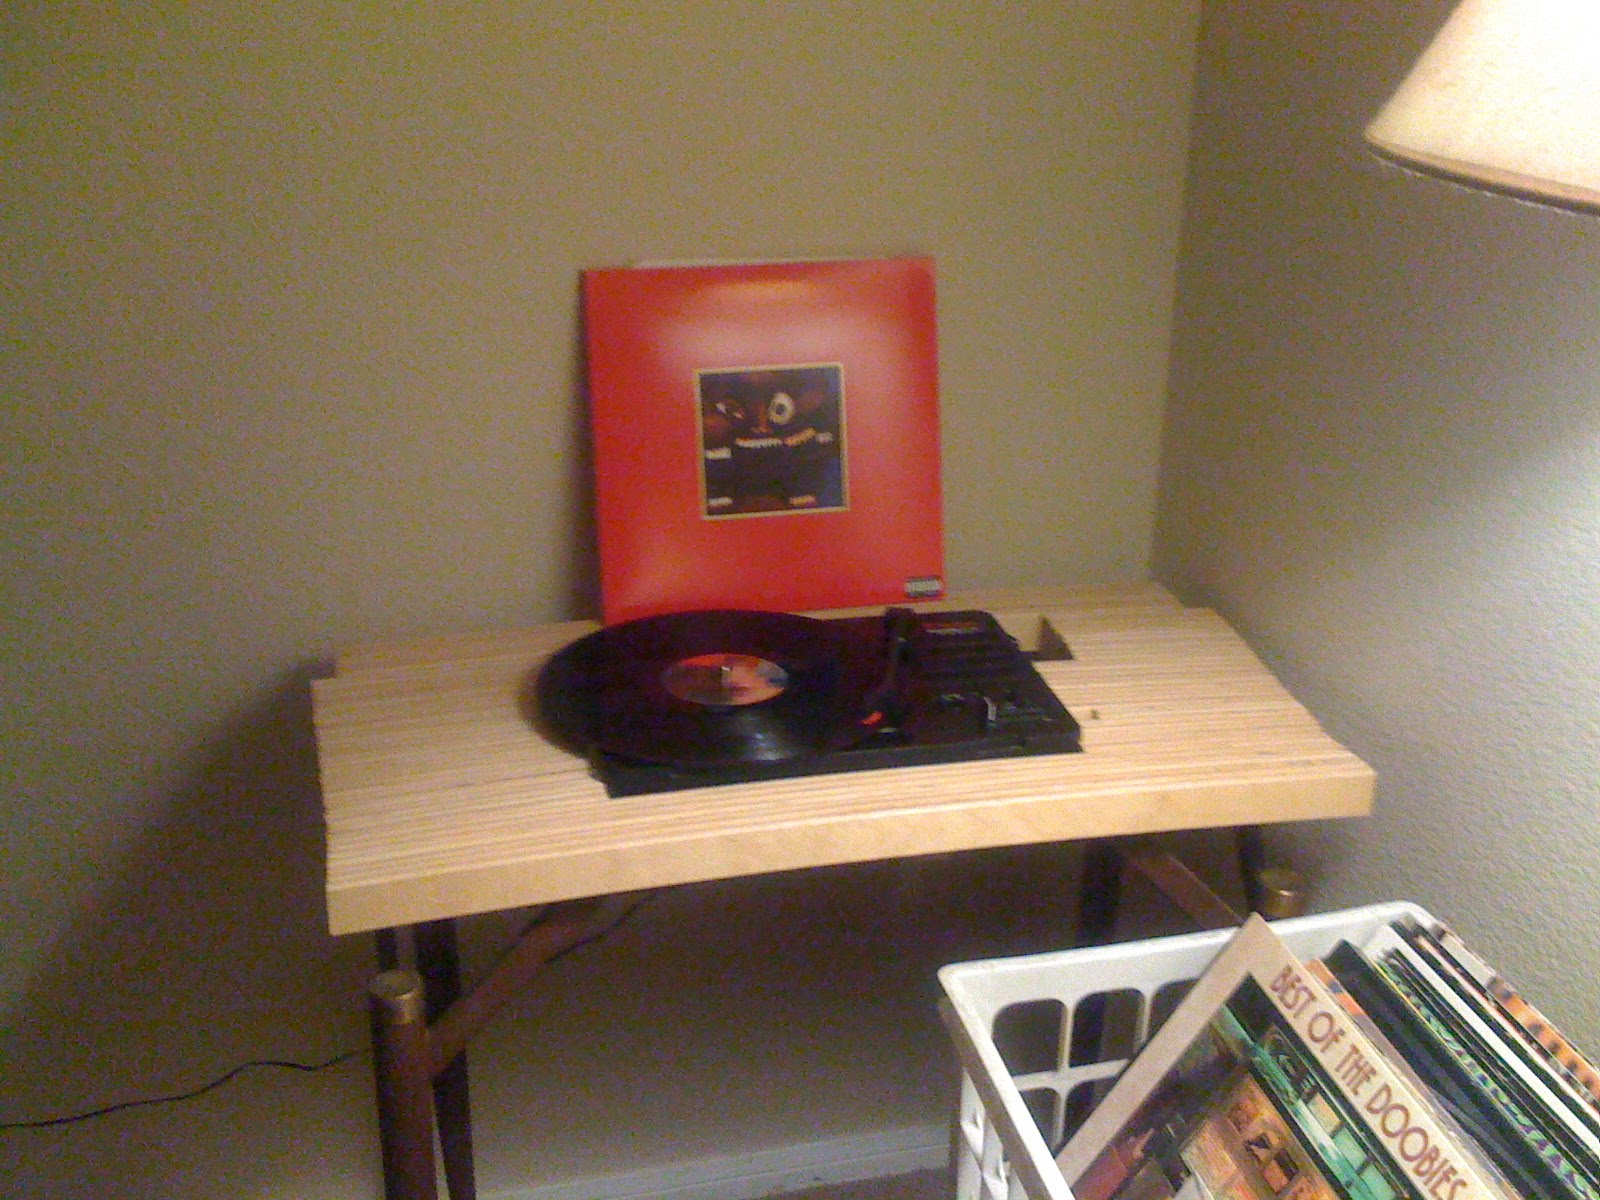
Sultan Lien Slats to Turntable Table
Materials: Sultan Lien Slats
Description: I replaced my Ikea bed and noticed that these slats were pretty solid when laid on top of one another. Wanting to give my turntable a more suitable home, I thought the slats could be arranged to leave a hole in the middle where the player could sit.
1. Measure and cut the slats. (leave room for audio jacks and on/off switch)
2. Glue and clamp each piece together. (Wood glue
3. 4 interesting steel table legs from a second-hand store, and there's a solid and low profile table.
~ Scott, Pasadena, CA
Good ol', cheapo upholstered Gorm Bar
Materials: Gorm Posts, Gorm Shelves, Gorm Corner Shelf
Description: This is I and my husband's first hack. After weeks of trawling through this site, I managed to convince DH that building our own bar would be cheaper than buying a new one.
We wanted an L shaped bar and thought about using expensive IKEA pieces for this, but settled for good ole, cheapo Gorm.
Supplies:
2 51cm GORM corner shelves - $26
8 51 x 77cm GORM shelves - $56
8 31 x 77cm GORM shelves - $40
24 packs of 110cm GORM posts - $96
Packet of screws - $9
Fabric - $16
13mm MDF sheets for the top of the bar - $13
Staple gun and staples
Hand drill
Total: $256
Click to read more>>
Quick table
Materials: LÄMPLIG chopping board, Vika Curry
Description: I needed a small table to put my printer on.
I couldn't find any table suited at the Ikea store, so I hacked one together from the LÄMPLIG chopping board and used 4 Vika Curry legs to support it.
It took me 15 minutes to piece it together and for €20 in materials it wasn't expensive.
~ Adri Mathlener
Labels:
furniture,
Lamplig,
Vika Curry
Whisky cabinet
Materials: Faktum cabinet, Perfekt bottle shelf, some boards, small angle braces
Description: My partner needed a cabinet for his whisky collection. We couldn't find a suitable one with correct dimensions and features, so he made an Ikea hack.
First he built a sturdy table-like frame to support the combination of the bottle shelf and the cabinet. He removed the bottom board of the cabinet and attached it a little lower in the frame to make more room for the bigger bottles. In the end, all parts were attached together.
The little table surface on the front side is handy, you can have the glass standing on it while you pour the drink.
~ Milla Bäcklund
Subscribe to:
Posts (Atom)