Showing posts with label outdoor. Show all posts
Sleek Stainless Steel Bird Feeder
Materials: Lansa Handle (21 7/8") $9.99, BLANDA BLANK Serving bowl(5"), Drill, Drill bits, screwdriver, pliers $2.99
Description: Start by drilling drainage holes in the bottom of the bowl.
Then drill a hole in the top just below the rim. In order to use the screws that come with the handle you will have to shorten it with the clipping blades on your pliers.
Thread the screw thru the hole below the rim of the bowl, then the extender piece then into the handle as far as it will go. Mark the screw at the excess point. Disassemble and cut the screw, you may have to make small nips to the tip of the screw to get a clean tip to thread into the handle's hole.
Reassemble if the tilt of the bowl bothers you you can insert a shim below the screw (small piece of wire, plastic etc.) however this will cause a small gap where the horizontal arm meets the bowl. I left my as is.
Insert into the ground, fill with bird seed and enjoy your new best friends as they come to visit!
~ Bambi
Labels:
Blanda Blank,
Lansa,
outdoor
What happens when a 10 ton tree falls on two aging sets TULLERO outdoor furniture?
Materials: TULLERO, power drill, circular saw, 90 degree clamps, bar clamps
Description: I used some of the spare parts to rebuild one of the sets. As I was trying to stuff the remaining wreckage into a trashcan, I noticed how much (mostly) intact lumber I had left. So a few hours and a lot of sweat later, I had an outdoor coffee table. I had previously painted the chairs and bench due to some ugly sun/water damage on the wood, the table had not had any major work done - all the blue pieces were once part of the chairs or bench, and the brown were once a table. The whole thing will be polyurethane coated to showcase the weathering of the wood and paint as well as some damage from the tree. With a full, undamaged set, this could easily be turned into a normal height table - I just did not have the lumber to do it.
Steps:
1) Take apart all the pieces of furniture. Save all the screws.
2) Lay out the long pieces from the bench and table to make an approximately square configuration. Depending on your asthetic taste, you may want to trim these pieces to the same length as I did.
3) Screw the long pieces from the seat of the bench into the under surface of the long pieces on either end. I put a third across the middle to take out some warp in some of the wood. If you overtighten the screws will stick through the surface of your tabletop.
4) Use two boards from the seat or back of the chairs to form a "L" shape along their length (I used 90 degree clamps and a few bar clamps to glue these rather than using screws, but screws should work. Repeat to form 4, these become the legs of the table.
5) Attach the legs through the table top using screw.
6) If you have some extra pieces you can use them as I did to form a lip around the edge
First picture shows nearly finished table, clamps still on trim. Second picture shows the same with the repaired but unmodified table from the original set.
~ J Ackerman
Labels:
outdoor
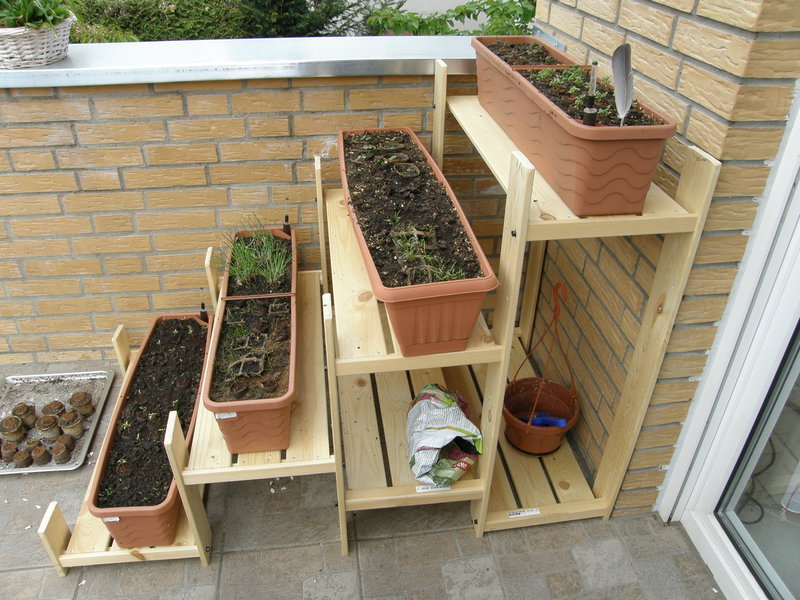
Herbal Regal for the Terrace
Materials: GORM and any tools
Description: So I made from the GORM a stairs for our herbs at the terrace
~ Frank Bendig, Germany Berlin
Modern flower pot
Materials: Ceiling lamp
Description: I bought this ceiling lamp at the AS IS section of Ikea.
When I saw it I thought it would be the perfect modern flower pot that is so hard to find for an affordable price.
It already has an opening in the bottom where the wire would normally go. Instead the water can make an exit through there now.
~ Heloisa Fiasco, Raleigh, NC
Labels:
outdoor
Stainless bowl hanging planter
Materials: Blanda 14" stainless bowl
Description:
1. Drill-guide jig is cut out (using radial saw) for lip of bowl and held in place with clamps. Underneath is a piece of cardboard marked with the locations of the 4 holes.
2. Tools: drill with self-pilot bit, hammer, center punch, wire cutters, another drill with countersink bit, and swaging tool.
3. Materials: 48" stainless cables with swaged ends (ebay), dual cable ferrules (ebay), stainless eyes and s-hooks (Home Depot), and these marvelous little disks I got out of a surplus box at Minton's hardware closing sale.
4. Center punch and drill drainage holes.
5. Place bowl in jig and drill through jig and bowl.
6. Rotate bowl 180 degrees, align with mark, and drill again through jig.
7. Rotate bowl 90 and 270 degrees, drilling remaining holes through jig.
8. Use countersink bit to remove sharp metal bits.
9. Thread cables through disk, making sure not to cross them.
10. Loop loose ends of cable and insert into ferrules.
11. Swage the aluminum ferrules, this takes 6 passes, 3 for an initial crimp and 3 more to really squish them. Very fun, but watch your fingers!
12. Insert an s-hook.
13. Hang and level.
It worked out perfectly that the cables I found were exactly the right length (48") and had one end with a swage fitting pre-attached. You can use regular stainless wire rope too (3/32") and cut it to length yourself - then you'll have to use the ferrules on both ends.
The discs are not absolutely essential but seem to help to add some cable tension that keeps the bowls at level.
~ Mark Papamarcos, Silicon Valley, CA
Labels:
Blanda Blank,
outdoor
Seed-starting shelves
Materials: OMAR shelving unit (I used 36 1/4" high, but you could use the taller one), 2 standard "shop fixtures" (48" long), 4 40-watt T-12 fluorescent light bulbs, 1 timer for the lights, 4 small metal S-hooks (or substitute), 1 two-plugs-to-one converter, 1 extension cord, several large pieces of cardboard (can be from OMAR box), 2 25-foot boxes aluminum foil, clear tape, masking tape, heavy plastic carpet protector (from an office supply store)
Description: I wanted to start seeds in my apartment for transplanting into my garden but I don't have an extra closet to dedicate to seed starting. I purchased the 36 1/4-inch (92 cm) high OMAR shelving unit and set it up against a wall in my bedroom. Why the OMAR? Because the shelves are wire, the height of the light fixtures can easily be adjusted as they are hooked onto the OMAR with S-hooks. Ideally, the grow lights are an inch or two away from the seedlings. I can unhook the chain, place the hook in another link, and rehang the light. I also like the OMAR's nonflammable metal construction, and its ventilation.
Click to read more>>
Subscribe to:
Posts (Atom)