Showing posts with label Besta. Show all posts

Ultimate Entertainment Unit


Materials: 2 Besta Shelf Units, part of Billy bookcase

Description: We have a long wall that we wanted to keep all of our entertainment stuff in (TV, Blueray, speakers, video game consoles, audio, etc.) but we also wanted to keep the whole unit low because we didn't want to block our windows. We had searched for a long, low unit but was never able to find one quite long enough.

My ingenious husband came up with an idea to just meld 2 of the Besta shelf units together using a couple of Billy bookcase shelves as the middle joiner and tying it altogether with some leftover tigerwood flooring that we had to make a cohesive top and some bottom facing.


The result is a custom entertainment unit that fits our space perfectly and provides all our storage needs. The only sad thing is that we'll probably have to include it when we sell our house because it fits here so perfectly.

~ Mary Wyga, Guelph

Built in BESTA Home Theater


Materials: 3 BESTA shelf units, 4 BESTA VARA drawer fronts, 6 Lack wall shelves

Description: We wanted to have a built in entertainment center for our basement home theater, it was currently sitting on some wire shelves. So we came up with a plan using parts from IKEA for this project plus a bunch of lumber and paint.

We started by building a base out of 2x4's to set the BESTA shelf units on. This was sized to fit the convenient setback in the wall in the basement.


Next we had to size the three IKEA shelf units were about 1.5 inches to long in total, so we happily voided any warranties and I modified the unit that would go in the middle.

After the modification were done, the bases of the shelf units were screwed down to the 2x4 frame and then they were fully assembled. All the wiring was run for audio, networking, and power hiding it in a gap behind the shelf units and in the walls.


We painted the back wall an accent color. The doors were installed on the unmodified units and we build a custom top to go over the BESTA shelf units to get the television the correct height. We also filled in the wall using the LACK shelves. Oh and we played some RockBand to test all the wiring connections.


We finished by installing the trim and painting the new countertop white to match the BESTA shelf units.

See more of the built-in Besta media unit.

~ Jason Whittenburg, Atlanta, GA

"Très chic" Kitty Litter Bin Obscurer


Materials: BESTA shelving unit + BESTA glossy swinging door, basic litter bin, dishwasher mat, PetSafe Big Cat Door, optional deodorizers

Description: This our a take on Jon's "Flaren stealth cat litter box" also listed on the site. His version's great, but since our space is a bit smaller and we have an ultra fluffy cat we needed an alternate solution since the enclosure-within-an enclosure concept didn't pan out too well (poo on fur = not a good thing!)

Step 1: Bore a hole into whichever side of the shelving unit you'd like. This is all a matter of preference. For us the left side of the unit was best.

Step 2: Install a pet door that suits your cat's size. We used the PetSafe Big Cat Door since our cat's quite large and fluffy.


Step 3: Place bin inside. Deodorizer (baking soda and homemade activated charcoal bag) additions are optional, but seems to reduce litter bin odour significantly.

And that's it! The unit does a great job hiding the litter bin and giving Taro some privacy while he does his business, and even though the litter bin odour isn't completely eliminated the set up reduces the smell quite significantly. Happy Hacking!

~ Jeremy Y., Mississauga ON Canada

Besta climbs on Expedit


Materials: Expedit, Besta

Description: We decided to move around the furniture in our living room, to get more space around the couch. We ended up with the Expedit and the two Besta bookshelves, which didn't really fit together, because of the different high and depth.

So we had the idea to put the Bestas on top of the Expedit. We only needed to remove the top of the shelves since it did not fit underneath the ceiling.
And we fixed the Bestas to the wall by using the attachments provided with the IKEA kitchen Faktum cabinets.


In between the two Bestas, I added extra shelves to put some decoration. And behind the green painting, we have the temperature control device for the heating system., which is now nicely covered, and can still be easily accessed.

Bye the way, those Bestas have a lot more shelves than the originally provided amount. They where bought in the hardware store. For us its the perfect book shelves, since they have the right depth for soft-covers.

~ Anna, Bremen, Germany

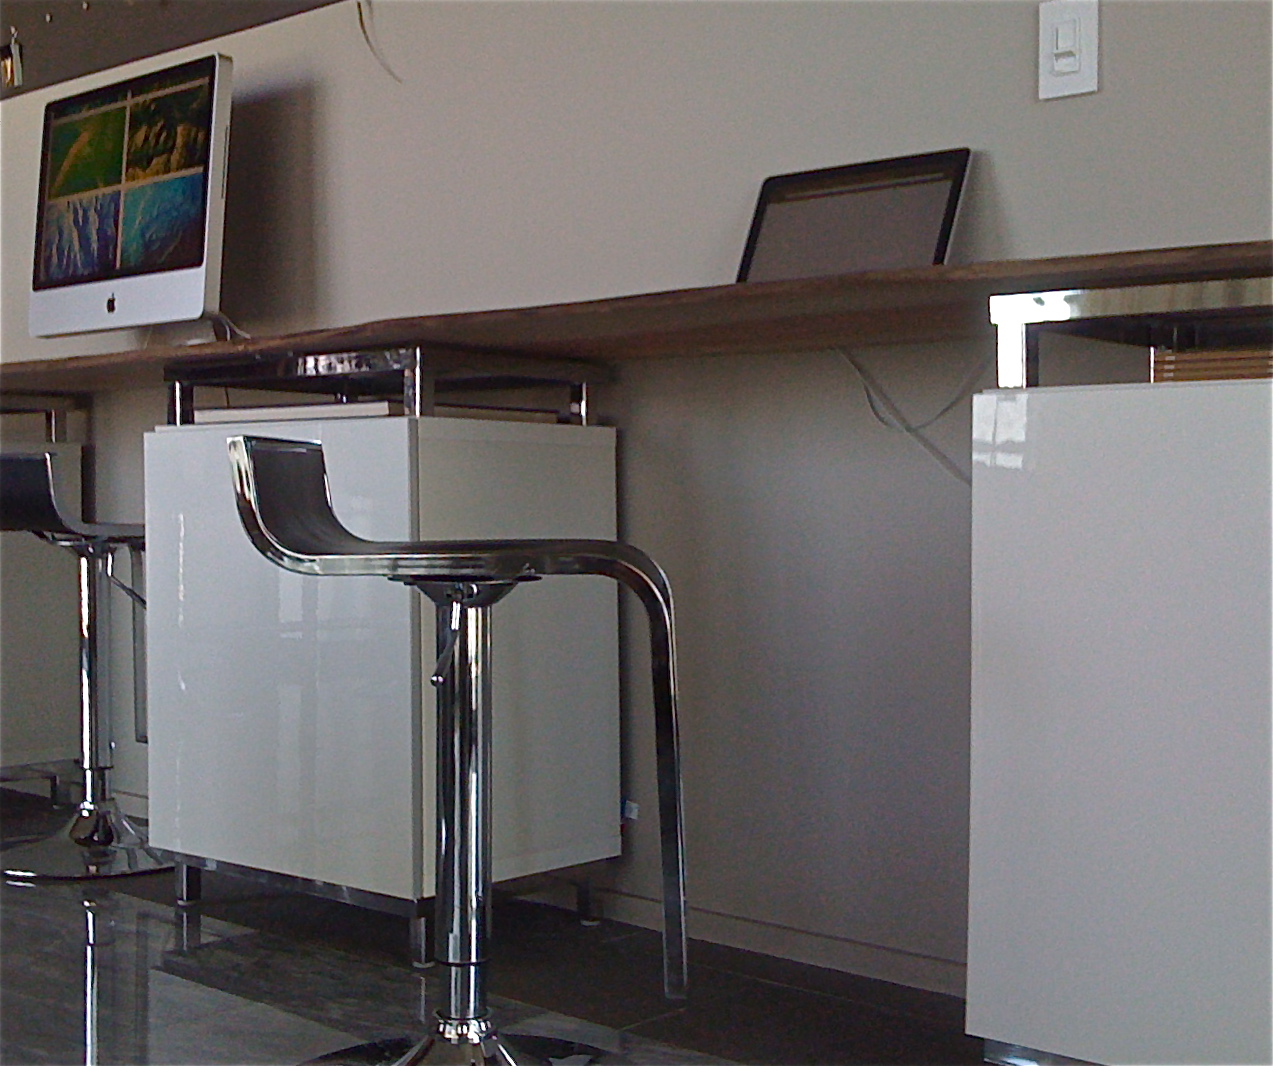
Working It


Materials: Besta base cabinets, Besta Chrome Underframes

Description: Creating a budget-conscious work station for two for our small Miami apartment required some thought...and several runs to IKEA.

Materials:
- Besta cabinets and doors (3)
- Besta underframes (6)
- Wood slab top

Two IKEA Besta cabinets on each end serve as our individual storage, with a third cabinet in the center for a shared printer, computer router, and supplies.

Each cabinet was assembled per instructions without the back panel to allow for ventilation and cord management. To make up for the stability of the missing back panel, L-brackets were screwed inside to stabilize the cabinets.


Using two sets of the Besta underframes in chrome for each cabinet (one as the base and one on top) raises the work surface to counter height. The top frames rest securely on screws drilled into the cabinet tops.


The counter top is a 12' slab of bobinga purchased from a lumber yard. By having the lumber yard cut one raw edge off (placed at the back wall), but leaving the front raw edge, we have both an organic look, and an ergonomic, soft edge for typing.


~ Ritch Holben and Ken De Loreto, Miami

Computer table with shelf for printer


Materials:
Besta, Vika Amon, Lansa, Vika RunTorp, Inreda

Description:
The Besta and Vika Amon table top are combined as one. As a cord storage, the Lansa handle was used. The printer shelf is extended via an Inreda pull out frame and standard shelf.


~ Albert Einstein, Austria

Besta Boas Chalkboard Room Divider


Materials: Besta Boas TV storage unit, medium-density fiberboard, chalkboard paint, industrial strength velcro

Description: We recently moved into a 1000 sq. ft. apartment and quickly discovered that our large couches only fit in one configuration in the living room. Unfortunately, this covered the wall designated for the TV. In order to fit the couches, we had to put our old, ugly TV stand in the area between the dining area and living room. We decided that we needed a better-looking unit that also served as a divider to separate the two areas. We drove four hours to Ikea only to discover that our chosen unit, the Besta Boas, lacked a back panel and, therefore, was unsightly from behind.

After some quick thinking in order to salvage our drive, we recalled how much we liked the kitchen that had a chalkboard wall in the last Pottery Barn catalog. We decided we could implement this on a smaller scale with the TV unit.


After assembling the Besta Boas, we measured the opening on the back. We then went to a local home improvement store and determined that MDF was the best choice material to cover the back, as it was lightweight, durable, and did not need to be sanded (we chose the ¼ inch thickness). We had the MDF cut to the correct dimensions (at no cost). We decided to affix the MDF to the unit with Velcro in order to allow for easy access to the wires and leave space for the power strip to plug into an outlet. Velcro also allowed for the MDF and unit to blend together seamlessly.


We painted the MDF with chalkboard paint (3 coats) and attached Velcro to the back of the top and left side of the MDF and unit. We chose industrial strength Velcro, so this was more than sufficient to hold it in place.

(Be sure to note the Ikea living room rug, Ikea picture frames, and Ikea table and chairs.)

~ Leah and Albert, Texas

Wardrobe hiding wires and fuse


Materials: Billy, Besta, Tombo doors, Grundtal rails, brackets and hinges from hardware store

Description:
In our 1903 apartment we were facing the typical problem of an ugly surface-mounted fuse box that we wanted to hide. As the ceiling is quite high, we couldn't find a piece furniture tall enough. So we took a Billy bookcase (79 1/2", 202 cm tall) and fixed it to the wall with metal brackets.


The fuse box is now hidden behind a Tombo door. All the extra wiring for the wifi-hardware is behind the door we built from one of the Billy shelves that we didn't need anymore.


To complete the wardrobe and get space for all our winter gear and helmets we hung a Besta shelf-unit/height extension (47 1/4", 120 cm wide) next the Billy, also with Tombo doors. The Besta had to be turned upside down because of the holes for the feet. The rod is made of two Grundtal rails. The Trones shoe storage makes the all-white wardrobe perfect. Unfortunately IKEA has discontinued the white Trones.


~ Jochen and Edith, Germany

Dump your old music cabinet


Materials:
BESTA, LACK

Description: Everything is getting smaller this days: no more vinyls, no more tape decks. But a good amp is still needed, so let's just get a smaller music cabinet for now.


I created mine from a small Lack side table. I used 4 Besta wheels instead of the table legs. I got at my local hardware store 4 metric threaded insterts. I just had to drill the hole to the correct diameter and screw them in. I also got 4 metric compatible bolts (allen in my setup).

~ Felipe Chas, Madrid, Spain

Custom bed headboard with Storage


Materials: MOSJO, BESTA extension, VIKA AMON, LACK

Description: I wanted to create a custom headboard for our bed which would fit nicely underneath our bay windows. Since you can never have enough storage the ability to lift up the top and dump winter duvets, extra pillows inside would be even better!

The basic idea was to take two TV stands (the MOSJO and the BESTA extension) which are the same depth but different width's and rotate them 90° so that they become storage boxes. Then custom cut a table top to fit on top of them. The addition of a LACK shelf mounted vertically to the edge of the BESTA provided a sturdy headboard to lean against. Everything was available in the same Walnut finish except for the MOSJO and this was going to be hidden at the back, lucky!


The only additional thing I did was to cut down the shelves that came with the BESTA to make them about 2" deep and screw them to the sides of the cabinet before attaching the LACK bracket in order to make the edge thicker and provide better support to the shelf.


See more of the custom headboard storage

~ Oli, Brooklyn, NY

Upholstered Ikea Besta


Materials: Besta, hammer, upholstery nails, pen, ruler, paper

Description: We used Besta cabinets for this project.

1. Cut a piece of paper in a pattern that you like and trace it on the doors.

2. I then marked, with a pencil, where I wanted the nails to be.


3. Hammer down an upholstery nail on each marking

4. Enjoy!


See more of the upholstered Besta as well as her other easy and cheap DIY projects.

~ Tina @ Signed by Tina, Sweden

Besta hack


Materials: Besta

Description: It's a simple Besta living with some little improvements.

My wife and I wanted a furniture with a simple and clean design where we put a flat TV, a Wii and a PS2 console with all their games and accessories (Wii Balance board, controller), a DVD reader (with our DVD collection) and an Hi-Fi: the project was aimed at creating a piece of furniture with these quality.

We bought 6 shelf unit 40x38 cm and 2 shelf unit 40x64cm and we hung them up the wall with plugs, by forming the design you see in the photo.


Because we hate dangling cables, we drilled some hole in the back of the bookshelf to allow cables passages: this solution achieved a clean design without cables in sight.

Moreover, we created a couple of drawers to place the DVD, games and console accessories. Because the drawer front is sold only in 16x69cm dimension, we bought two standard 60x38cm doors and we engraved the inner side using a milling cutter.

~ Gabriele, Rome, IT

Waooouu! How did you find a TV that fits perfectly with Besta?


Materials: Besta

Description: "How did you find a TV that fits perfectly with Besta?"

It's surprising, but I actually heard many times friends asking me that when looking out our media center installation.

At the beginning of this project, my girlfriend chose the Besta at Ikea and told me that it would fit well in our living room, with plenty of storage place. Fine, but I found that all the TV frames sold by Ikea were ugly and did not provide adequate hiding for all the mess involved with the rather "DIY" style I have.

Then I found the idea of using the Besta TV element, devised to go with sliding doors, but with opening doors, cut to size. My goal was to have the TV included in the neat surface of all the white gloss Besta doors. I also wanted to have access to the back side of the TV, for easier cable modifications. At last I wanted to spare some of the space behind the TV for storage of electronic stuff...

I ended with the solution displayed in the pics.


Installation steps:
- cut a thick (15mm or so) plywood sheet to hold the TV set, with holes for venting and cables access;
- install it in the Besta, keeping in mind the depth of the TV set, so that everything aligns at the end of the trip;
- hang the TV on it. down to the knees, small prayer, everything holds!
- cut the doors to match the size of the tv set. I used first a jigsaw for the rough cut, but for a perfect look, I used a handheld router with a copy bit, with a metallic rule as a guide. I am pretty satisfied with the final result (that was a challenge which my father and brother told me "you'll never have a straight cut on Ikea". Then I added a finishing black liner. I do not mention all the adjustment back and forth steps.
- install doors with a bit of adaptation, since it is not designed for that...
- close everything and enjoy!

optional:
- install a fan to force hot air (40-50°C) out. (not yet done)
- drill 2 holes in the bottom, install IR LEDs for Wii bar replacement...

Final steps:
- Wait for the reaction of friends.
- Take pics for ikea hacker
- Pray your TV set do not die, you'll probably end up cutting a new door, and that's painful.

~ Jerome Samson, Paris, France

Check out this stream