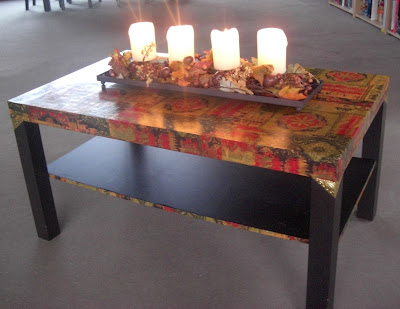
Lack gone oriental
Materials: Lack table, decoupage paper, thin metal plate, decoupage glue, decoupage lacquer, pencil, all-purpose glue
Description: We had this Lack table for ages and wanted something fresh without investing a lot of money or having to throw out something that is still good.
So I decided to spice up our Lack table to match our colorful living room.
Step by step:
1. Wipe the table clean with a moist cloth and let it dry.
2. Spread the decoupage paper on the table the way you want it to be later.
3. Apply a coat of decoupage glue where you want to fix your decoupage paper. Don't apply more than you need for one sheet, otherwise it might dry too quickly and you will have to apply glue again, resulting in thicker layers and uneven results.
4. Apply the decoupage paper and try to apply it without bubbles. It worked for me to have my wifeys help, she held the paper on two edges and I smoothed it down onto the table.
5. Be sure to have enough paper overlapping the edges of the table, you will want to wrap it around properly.
6. When you finished the applying of decoupage paper on top of the table, go for the small side of the shelf. I glued more decoupage paper than needed on it and after drying I just cut the overlapping rest with a scalpel.
7. Coat the entire decoupaged surfaces with decoupage lacquer for a brilliant or a matte finish (you will have to choose yours). Try not to go over the same spot many times, as it may cause the thin paper to break.
8. Allow it to dry about an hour before applying the second layer of lacquer.
Edge decoration:
1. Get a golden, silver or copper colored very thin plate of metal.
2. First design your desired edge decoration on paper and hold it on to the edges of your Lack table. If you like it, then it's gonna be your model.
3. According to the paper model, cut 4 identical triangles out of the metallic plate. It really has to be thin in order to be cut with normal scissors.
4. Cut the shape into it (here the little bows).
5. Turn the ugly side (you will have one ;)) upside so you can write on it and lay it on a soft underground (a carpet or a thick cloth for example)
6. With a pencil impress the wanted design onto each triangle and then fold it in the middle.
7. Adjust the triangles on the edges and if you are happy with the result glue them onto them with all purpose glue. I used Uhu.
~ Sarah, Germany
Subscribe to:
Post Comments (Atom)
Check out this stream
Blog Archive
-
▼
2010
(569)
-
▼
November
(164)
- Tutorial - How to Make a Snowflake Paper Lantern
- Tutorial - How to Make a Floral Hair Wreath
- Fold up workshop
- Tutorial - How to Make a Holiday Bow Wreath
- Bookcase with scratching post and hammock
- Tutorial - How to Make a Felt Envelope Gift Bag
- Free Christmas Printables
- Chest of drawers to a bed
- Tutorial - How to Make Abstract Mini Fabric Scrap Art
- Woodsy, antique ikea table
- Malm Dresser Up-Do
- Tutorial - How to Make a Recycled Insulated Window...
- Tutorial - How to Make Herringbone Tucks Pillows
- Link Latte 146
- Recipe - How to Make Refried Beans
- Tutorial - How to Make a Stuffed Baby Elephant
- Tutorial - How to Organize Fabric with Mini Bolts
- Tutorial - How to Make a Felt Owl Hairclip
- Bedroom dress boys
- Queen-size MALM Murphy Hack
- Tutorial - How to Knit Simple Tubular Cast-On
- Tutorial - How to Make Gold Leaf Candle Holders
- Tutorial - How to Make Digital Mixed Media IPod Art
- Splendid Abandoned Airplanes
- Christmas Subway Art Printables
- Enclosed Lack entertainment center
- Nature-inspired Enje roller blind
- Tutorial - How to Make Quilted Christmas Ornaments
- Alex Credenza
- Tutorial - How to Make a Child's Apron from a Pill...
- Patrull air cleaner hack
- From trash to tea table
- Tutorial - How to Make a Handbound Jotter Book
- Tutorial - How to Make a Tote Bag
- I'm Thankful for.....
- Turn your blah Fjellse into a FAB upholstered bed
- Tutorial - How to Make Bottlecap and Scrabble Tile...
- Tutorial - How to Napkin Folding for the Holidays
- Future of Personal Computing: Post-iPad Concepts
- Recipe - How to Make Cranberry Sauce
- The dreaded Kids Train Table with a new twist
- Tutorial - How to Make a Chalkboard Bunting Banner...
- IKEA shelf-evators
- Tutorial - How to Make a Refashioned Button Skirt
- First DRB Feel-Good Issue
- Tutorial - How to Make a Sewn Paper Doily Garland
- Tutorial - How to Make Clickable Images as Blog Menu
- Lack gone oriental
- Tutorial - How to Make a Felt Reindeer Applique T ...
- IKEA Play Supermarket
- Tutorial - How to Make a Wrist Corsage
- The Giant Mecha-Spider Attacks!
- Tutorial - How to Turn a Onesie into a T Shirt
- WIN Star Wars Millennium Falcon 3D Book!
- Crochet Pattern - How to Make a Rosette Scarflet
- Trash to treasure- Literally!
- Tutorial - How to Make a Folded Map Gift Bag
- Waooouu! How did you find a TV that fits perfectly...
- Tutorial - How to do Right Angle Bead Weaving
- Tutorial - How to Make Recycled Bottlecap Embellis...
- Tutorial - How to Make a Header / Banner Using onl...
- Tutorial - How to Make a Baby Jar Advent Christmas...
- Tutorial - How to Make a Ho-Ho-Ho Felt Gift Bag
- Tutorial - How to Make a Pom Pom Pillow
- Tutorial - How to Make a Fabric Tube Turner
- Giant drum shade pendant for 13 bucks
- Tutorial - How to Make a Fairy Wand
- EXPEDIT board in IKEA sale corner to a nice coffee...
- Tutorial - How to Make Polymer Clay Buttons
- The Origin of Symbols: Fun Facts, Art & Photography
- Tutorial - How to Make Rag Ball Ornaments
- GRONO/JUTIS Floorstand Lamp
- Tutorial - How to Create Crumpled Tissue Mixed Med...
- Great stamp collection on the Rast
- Thanksgiving Centerpieces
- Tutorial - How to Make Baby Cowboy Boots
- Masking tape my IKEA world
- Tutorial - How to Make a JOY Applique Potholder
- Tutorial - How to Make a Record Album Cover Magnet...
- Tutorial - How to Repair Your 18-inch American Gir...
- Malm bed with loads of underbed storage
- Tutorial - How to Make a Small Rag Quilt Christma...
- Bonde sideboard with tree legs
- Tutorial - How to Make a Web Ad with Photoshop
- Wild Thing Chair
- Tutorial - How to Make a Simple Christmas Stocking
- Tutorial - How to Make Painted Wooden Pilgrims
- Tutorial - How to Make Single - Use Leaf Soap
- Free Printables for Christmas
- Cute Baby Animals Update
- Tutorial - How to Make Paper from Hosta Plants
- Tutorial - How to Make a Leaf Headband
- Lack Torrone Table
- Tutorial - How to Make Photo Christmas Cards
- Ikea Avsikt now soft closes!
- Tutorial - How to Make Copper Pumpkins
- VIKA desk goes glam
- Tutorial - How to Make Stamped Tile Coasters
- Tutorial - How to Make a Paper Mache Christmas Orn...
- Tutorial - How to Lace Up and Frame Embroidery
-
▼
November
(164)
0 comments:
Post a Comment