Showing posts with label bathroom. Show all posts
Yarn that Blanken
Materials: BLANKEN, plastic bags, scissors
Description: I like the BLANKEN shower caddy but somehow all my stuff falls out of it, when I shower.
To solve this problem I grabbed some white plastic bags and cut them in stripes. I wrapped the plastic "yarn" around the caddy and now everything stays in place. Super simple hack.
See more of the Blanken shower caddy hack.
~ Gerry, Kiel, Germany
Wooden bathmat/duckboard
Materials: Beddinge slats
Description: Having my kitty litter box in my bathroom means always having bits of kitty litter everywhere. It's most annoying when I step out of the shower. A solution to that is a slatted wooden bathmat/duckboard - regular mats simply catch the litter.
Unfortunately, where I live, finding one is relatively hard and the version that I did find (rope and wood) wasn't good enough.
Then, I was cleaning out some things and found some wooden slats that I kept from an old Beddinge sofa bed.
I had about twenty or so and laid them all out, eliminating the ones that didn't match in height or were somewhat warped. I ended up with five that were pretty similar.
I then took a square dowel that I had laying around and hot glued it along the middle using two glue sticks on either side to space them - I didn't have small finish nails or long staples.
I was concerned about the it sitting in water, so I put globs of hot glue on the edges of all the slats. This also helped with the grip on the floor.
The result is kind of cool - because it is curved, the middle part rises up when it's not stepped upon. That means that no dirt collects under the middle bar. The water can dry away easier, as to avoid rot or mold. (Where I live, there is a central drain in the floor, meaning that the floors can get really wet at times.)
Any how, it's perfect and cost absolutely nothing to make. Hope it inspires others.
~ Tien, Sweden
Bekvam + Fullen Solve 3 Problems
Materials: Bekvam, Fullen, Ekby Valter, Saw, Drill, Rotozip
Description: My family and I recently moved to a new apartment. We brought with us a 3 year old Bekvam kitchen cart that simply did not work for our new kitchen. Rather than sell or throw away the Bekvam, I decided to make use of the wood and hardware.
Our bathroom had a sink mounted on the wall with no storage underneath. This was a problem for us, so I decided to go out and buy a new Fullen cabinet. Fullen's do not have tops, but the top of the Bekvam was just the right size. Using my Rotozip tool, I cut a large "U" shape out of the Bekvam top, sanded it down a bit and attached it to the Fullen using a couple of angle brackets. I finished it off by sealing the gap between the wood and the sink with white silicon.
There's an odd gap in our kitchen between a couple of built in closets/cabinets. It turned out that the two Bekvam shelves would fill that gap perfectly. Using a few mending plates, I attached the two shelves together at the bottom and then attached them to two new Ekby Valter angle brackets. After mounting them on the wall, we had a new home for our microwave.
I was left with the Bekvam legs, part of the top and the apron. Using my circular saw, I cut the remainder of the top into two rectangles, which became the new top and shelf. After trimming the Bekvam's apron pieces down to size, I attached them to the new Bekvam top using the original hardware and reattached the legs (which were also shortened by 6 inches). Using a band saw, I cut rectangular notches out of each corner of the new Bekvam shelf, stuck four old wooden dowels in the existing holes in the legs and rested the new shelf on top. We now had a new end table and cat perch.
Overall, I'm quite pleased with the results. I'll probably end up painting the table, but for now, it's fine as it is.
~ Doug
Low End to High End Half Bath via As Is
Materials: Nexus Yellow Brown cabinet cover panels; drill, jig or circular saw, tape measure
Description: This half bath in our 1950s house was utterly dull and style-less. I was going to redo it with conventional painted drywall but then I got the brilliant idea of paneling it with the 3x8 Nexus Yellow-Brown kitchen cabinet cover panels that I'd scored in the AS IS department of IKEA awhile back for $10 each!
We had five panels, which sounds like a lot but it wasn't quite enough to do the whole room. So I decided to do half tile and half paneling, with a sill on which the panels could sit to give it a very finished look.
We had to build out the walls a bit and sheath the studs with cement backerboard for tiling. I did the tiling first (cheap 3x6 tile from Lowe's!), then we hung the panels. The room is 8' and we tiled up a little higher than 4' so that we'd have some wiggle room cutting the panels. All cut edges are in the corners, which weren't exactly plumb so we had to carefully mark each inside corner cut to get the right fit.
I recommend scoring each cut with a very sharp utility knife before sawing to minimize splintering.
Panels were screwed into place with finish screws and I filled the holes with wood filler and then actually cut tiny pieces of veneer and glued them over the filler. This was a bit fussy. If I had to do it again, I'd use the color hard wax filler sticks.
Last, I caulked the corner joints with a silicone caulk in a color to match the wood after carefully masking off each joint. I left the vertical joints in the middle of each long wall and above the doorway and window uncaulked since they were straight and had finished edges.
~ Kathy
Bathroom business
Materials: IKEA EFFEKTIV
Description: The modularity of Ikea's office furniture makes it far more useful than the typical bathroom vanity cabinet. Cabinets and tops combined with Ikea Capita or Utby legs allow open shelf storage for out of sight but plugged in and ready to go hairdryers, curling irons,shavers etc.
~ Mark J. Marcinik, San Francisco, California
18" Ensuite Bathroom Vanity
Materials: Bekvam
Description: Put off by outrageous prices for bathroom vanities and an awkward space to fill in my ensuite bathroom, I turned to Ikea Hackers for inspiration.
Not to be disappointed, Karen from SFO gave me the great idea to use the Bekvam butcher block as a base for my shaker style vanity with above counter sink.
The materials list and cost is as follows:
- The Bekvam cart: $59.99
- Cabinet door from as-is section at Ikea: $5
- 1 piece of 20" x 48" x 3/4" pine lumber from Home Depot: $11
- 2 hinges: $4
- I used left over paint and stain I had stored in my workshop for the finish.
So total cost for the vanity was 80 bucks. The sink and faucet ran me about $325 at a local bathroom supply liquidator. The manufacturer of the sink and faucet is called "Rubi".
In a nutshell I used the basic frame of the Beckvam for the counter top and legs. I disassembled the shelves that come with the bekvam and used the wood to create the detail on the sides where the lumber meets up with the bekvam structure. I did the same in the front face where the door meets bekvam. The result is a smoother transition from the existing structure to the add on components (lumber and door).
For the finish I used a very durable oil based melamine paint (2 coats). I stained the counter top and sealed it with 2 coats of varathane and buffed it with paste wax for added protection from the water.
~ Jeremy, Montreal, Canada
Lillangen bathroom remodel
Materials: Lillangen, Bjorken,
Description:
| before |
Both cabinets got ring pulls and a coat of turquoise paint on their fronts. I also used the Bjorken medicine cabinet, hanging it horizontally,and creating a solid front for it and painting and adding pulls to match the sink base.
You can see more about my hacks and bathroom renovation here on my blog.
~ christie
IKEA vases for a translucent rounded bathroom wall
Materials: Rektangel vase
Description: The REKTANGEL vases are used as glassblocks in the design of a distinctive loft located on the first floor of a historic warehouse and monument on the Brouwersgracht in the center of Amsterdam. The apartment is designed by Marloes van Heteren of SOLUZ and Remco Wilcke of CUBE architecten.
In the architecture a contrast has been sought between preserving the historic beams and floors, and minimalistic new additions. The new additions such as kitchen and bathroom would be clearly identifiable as such in terms of materiality and form. Letting in daylight and transparency was also very important in the design of the open floor plan.
The bathroom is the central element in the house situated at the intersection of public and private. The rounded translucent bathroom-wall consists of nearly 1,000 very special glass blocks; IKEA rektangel vases. The vases are painted white inside and arranged together with strong transparent glue. The use of two different sizes creates a very nice pattern. During the day the sunlight gets in the bathroom an at night the bathroom wall acts as a subtle light-object in the apartment.
See more of the Rektangel glass wall.
~ Marloes van Heteren (SOLUZ architecture, design and advice), Amsterdam
Bathroom makeover
Materials: Billy, Billy Morebo, LILLANGEN, Capita, ANNO STRA
Description:
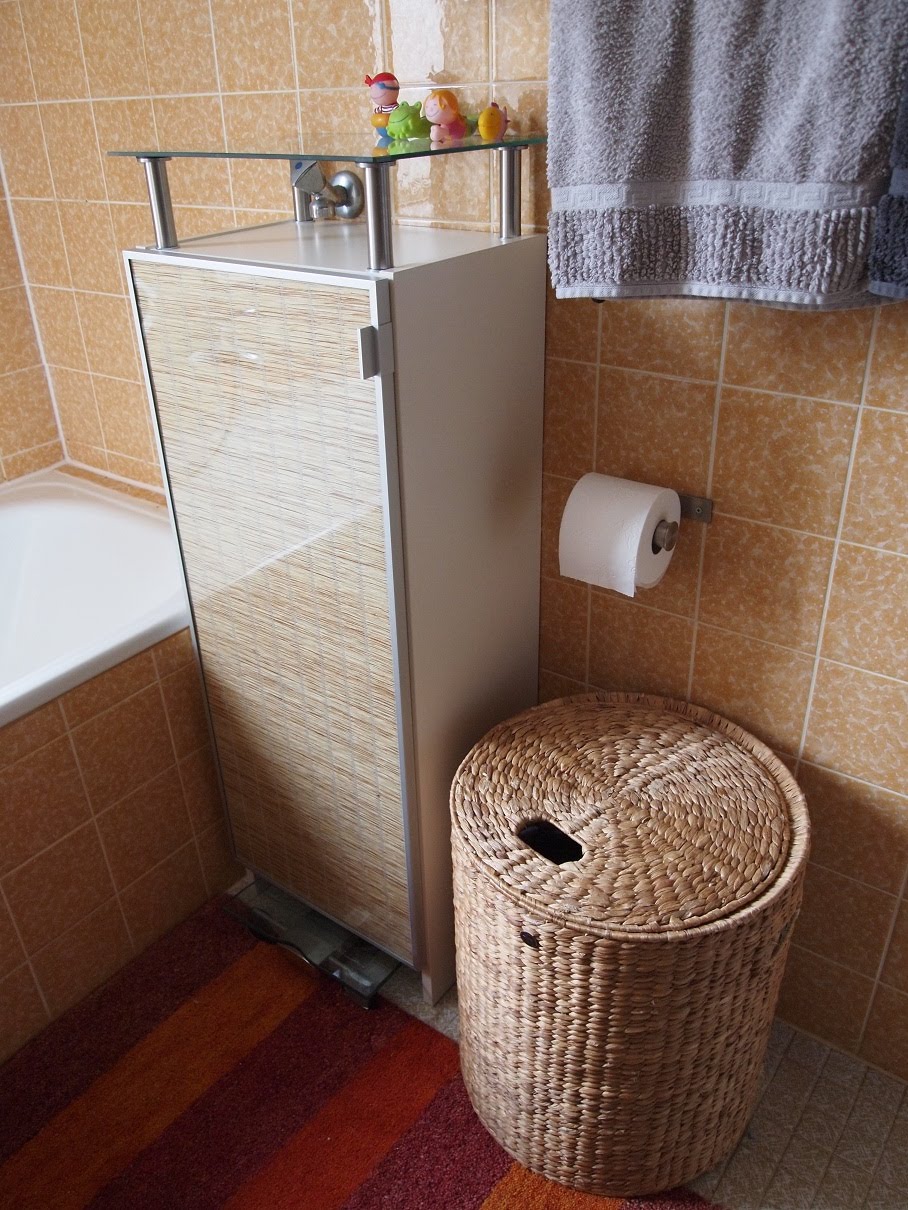
We have a very small bathroom (barely 4,5 square meters) and where sick of looking at the old plastic-and-glass thing that held our towels. So we went out to Ikea to get some ideas.
First we introduced a new carpet matching the tiling. Than we looked for a replacement for the ugly glass rack. The space is really tight and has the connectors for a washing machine in the middle, we needed some way around that.
We settled for a 40x106cm Billy shelf with a Billy Morebo door to keep out the dust.
We found two Lillangen top opening wall cabinets that would fit neatly over the door, so we bought them as well.
We have a big rattan clothes basket and wanted to make the door look in the kind of same look. The Anno Stra curtain was the closest thing we could find, so we fitted it inside the Morebo door.
To get some more space that would be accessible from the bathtub we mounted 4 Capita legs up the Billy shelf and glued a glass plate from the old rack on top.
So here are the results. We are really happy this turned out, our small bath has suddenly a lot of space.
~ Tarwin, Munich, Germany
Bygel Hanging Shower Rack Hack
Materials: Bygel Rail, Blanken Shower Shelf, Bygel metal "S" hooks
Description: Not really a hack, more of a Hackea, I used to have one of those cool shelves in the corner of my shower on an extension pole. But it was getting rusty. Leaving rust on the soap. Not wanting to replace it with something that would rust out again in 5-6 years, I started searching for a replacement. I found this corner shelf at Ikea, but had no idea how to hang it. I tried hanging it with those 3M Command hooks
~ Rob, Burien (Seattle), WA, USA
Floating Bathroom Shelf Made with Kee Klamp and Lack Components
Materials: LACK, Kee Klamp fittings
Description: Floating bathroom shelves from Kee Klamp
See more of the floating bathroom shelves.
~ Chris Pollock, Rochester, NY
Sink on the Edland bedside table
Materials: Edland bedside table, sink, plumbing
Description: We have a bedroom and a bath in the same space. We wanted to make the most of a small space and stay within our tiny budget. I felt in love with Ikea Edland bedside table and find it just perfect for a boudoir-feel bathroom.I put 2 coats of clear satin waterproof stain on it to avoid water cased damage.
We cut a hole on the top of it,and put the sink on, attached a drain pipe, and had a plumber install the faucets. Voila!
See more of the Edland sink.
~ Kata alias Joie Vivre, Budapest, Hungary
Cheap Vika Glasholm Bathroom hack
Materials: Vika glasholm (2X) glass clamp fittings for wall/floor
Description: So here's the problem, bathroom shower cabins are expensive (very expensive)
And most of the time too small for my taste, so i went looking for a walk in shower system only to discover these were ABSURDLY expensive.
So the next best idea was to make something myself and just go DIY.
When searching for hardened glass i stumbled upon the Vika Glasholm desks.
These puppies are 10mm thick (compared to the standard 6 or 8 mm for pre- or custom built showers, and they can carry 50Kg according to Ikea.
So then I got online to search for some glass clamps and I found some cheap too (not an easy task).
Put 1 and 1 together and voila there you have it, one big shower.
For this hack people might want to use the simple frosted glass version but we liked this one just a bit more.
In my opinion not REALLY a hack but just used in a different fashion.
~ Rubin, Eindhoven
Labels:
bathroom,
Vika Glasholm
Subscribe to:
Posts (Atom)